


 Ripping high resolution Blu-ray audio just got easier thanks to Computer Application Studio. Its newest release of DVD Audio Extractor now supports Blu-ray audio. There are a few caveats to be aware of prior to embarking on a Blu-ray ripping weekend. This article details the software and hardware requirements and the simplest method of ripping Blu-ray audio to date. This method isn't free but I guarantee it's easy enough for even the most unseasoned computer audiophiles.
[PRBREAK][/PRBREAK]
![]()
![]()
Introduction
Many Blu-ray discs contain Dolby multi-channel and Linear Pulse Code Modulation (LPCM) two channel audio mixes. Thus, concert Blu-ray discs can be a terrific source of uncompressed high resolution audio playable on a traditional Blu-ray player or a music server. Playback using a music server or computer is best accomplished by ripping the audio from the Blu-ray disc on to a hard drive. There are several ways to rip the audio from a Blu-ray disc. Some of these methods are free, some rip only to lossy audio formats, some are difficult to use, and some are very time consuming. The following tutorial details what I believe is the simplest method of ripping lossless Blu-ray audio that's ready for importing into a music collection without spending hours curating the audio files.
Requirements
Operating System: Windows7/Vista/XP (32-bit/64-bit) ![]()
I use Windows 7 Ultimate 64-bit running on the Boot Camp partition of my MacBook Pro to rip Blu-ray discs. Any computer capable of running Windows 7 should work just fine.
* Note: Blu-ray ripping software for the OS X operating system does exist but I haven't been able to rip the audio to a lossless format with the OS X apps. Hopefully in the near future this will be possible.
Application 1: Passkey for Blu-ray ($60) ![]()
Passkey for Blu-ray is an application / driver that decrypts Blu-ray discs. This allows other applications to read the unprotected disc. DVDFab also offers a complete Blu-ray ripping solution, but it doesn't support ripping lossless audio at this time. i.e. even WAV files are not lossless when produced by the DVDfab solution. Thus, the need for better ripping software.
Application 2: DVD Audio Extractor ($38.50) ![]()
DVD Audio Extractor is an application to rip the audio from Blu-ray, DVD-Audio, DVD-Video, HDAD, and other discs. Because DVD Audio Extractor doesn't decrypt Blu-ray discs the aforementioned Passkey software is required. DVD Audio Extractor has a really nice user interface for ripping Blu-ray discs. It supports ripping to several formats and splitting up the Blu-ray music into individual tracks unlike most Blu-ray ripping software.
Blu-ray disc drive: I use the Pioneer BDR-XD04 ($123.99) ![]()
Any Blu-ray drive should work fine for this tutorial. I selected the Pioneer USB 2.0 External Slim Portable Blu-ray Disc Writer with BDXL Support Model BDR-XD04 because it's powered by a single USB port and is very compact. This drive also works on Mac OS X 10.8.1.


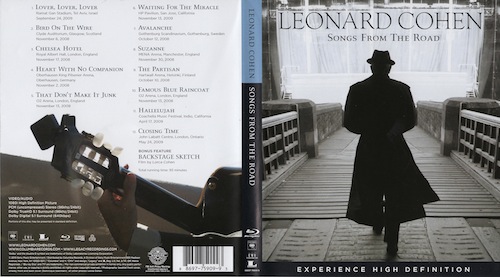
The Blu-ray disc I am using for this tutorial is Leonard Cohen's Songs From The Road. I really enjoy the music, the sound quality (Mastered by Doug Sax and Robert Hadley), and the back cover of the Blu-ray clearly identified a PCM (uncompressed) Stereo (96khz/24bit) version of the audio. Most Blu-ray discs aren't this explicit but will usually say Stereo PCM if there's a stereo version on the disc. The quality and sample rates available are all over the board. Readers should post opinions and objective information in the Music Analysis forum ![]() when possible. Also The site Blu-ray.com has a plethora of information about Blu-ray discs. Here is a link to the Leonard Cohen disc on the site -> Leonard Cohen: Songs From The Road
when possible. Also The site Blu-ray.com has a plethora of information about Blu-ray discs. Here is a link to the Leonard Cohen disc on the site -> Leonard Cohen: Songs From The Road

Back cover of Songs From The Road Blu-ray
Step By Step
Pre-ripping Step A. Install Passkey for Blu-ray and DVD Audio Extractor.
Pre-ripping Step B. Insert a Blu-ray disc. Upon disc insertion Passkey for Blu-ray will display a little yellow popup window by the system tray (next to the Windows time in the lower right corner). This will let users know the decryption process is in progress and or complete. This usually takes ten seconds.
Step 1. Once decryption is complete launch DVD Audio Extractor. The following window will appear with several Titles and Chapters. Most of the Titles in the left box are very short and couldn't contain the entire Blu-ray content. On this Blu-ray Title3 is the only Title long enough to contain twelve tracks at one hour and eleven minutes. Selecting the other Titles doesn't hurt and will give users an idea what's contained in those Titles such as transitional menus or Blu-ray extras. Once Title3 is selected in the upper left box, the available audio tracks are displayed in the lower left box. I only have a two channel audio system thus select the English LPCM (96kHz 2CH) version for extraction. A huge benefit of DVD Audio Extractor is the ability to enter metadata before ripping the Blu-ray Audio. Chances are slim to none the metadata will be in the database used by the application but entering in this data manually isn't the end of the world. On this specific Blu-ray I de-selected Chapter 13 from the right side box because I don't want to extract the 0:03 track. The short length is a dead giveaway that this isn't an audio track. Once the first screen looks like the image below click Next >

![]()
![]()
![]()
![]()
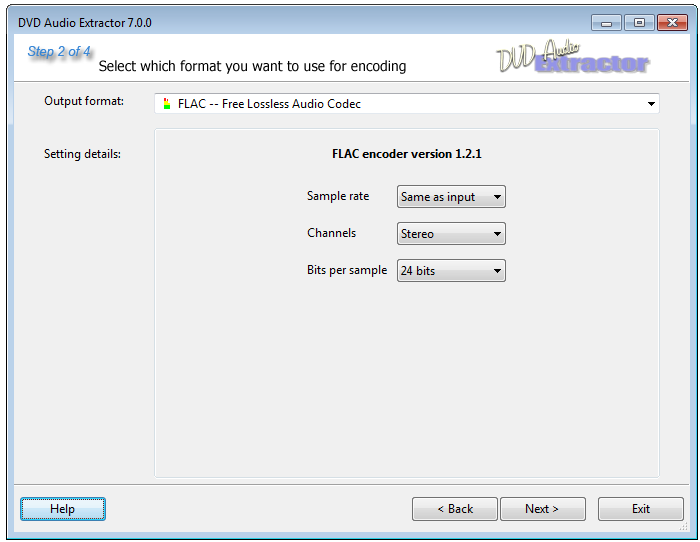
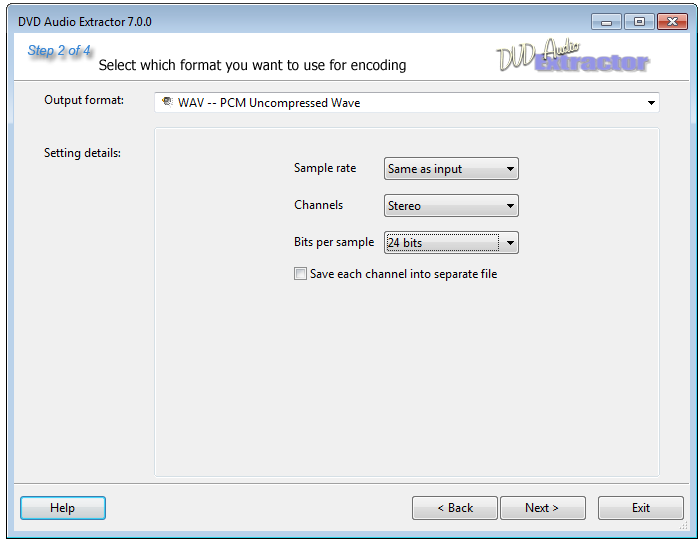
Step 2. Select the preferred output format. I select FLAC for its metadata support and playback support on a wide variety of music servers. I set the Sample Rate at "Same as input", Channels at "Stereo", and Bits per sample at "24 bits". Most Blu-ray discs don't identify if the bit depth is 16 or 24 bits. Setting the Bits per sample to 24 bits will not hurt if the audio is only 16 bits. Play it safe by using the 24 bit setting or use a different set of geeky applications to identify the bit depth ( eac3to ![]() and HdBrStreamExtractor
and HdBrStreamExtractor ![]() ). Once the parameters are set click Next >
). Once the parameters are set click Next >
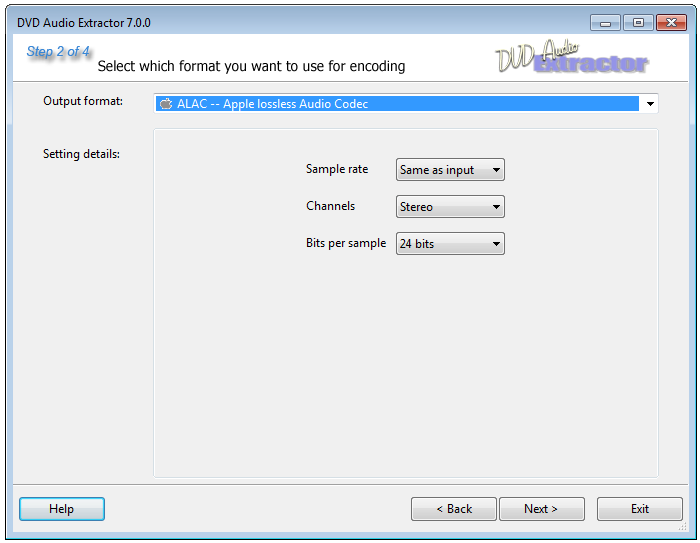

Click to enlarge ALAC, PCM, WAV.
![]()
![]()
![]()
![]()
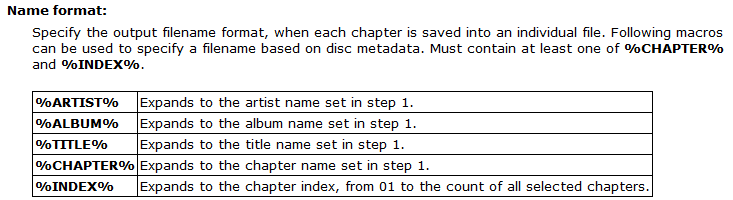
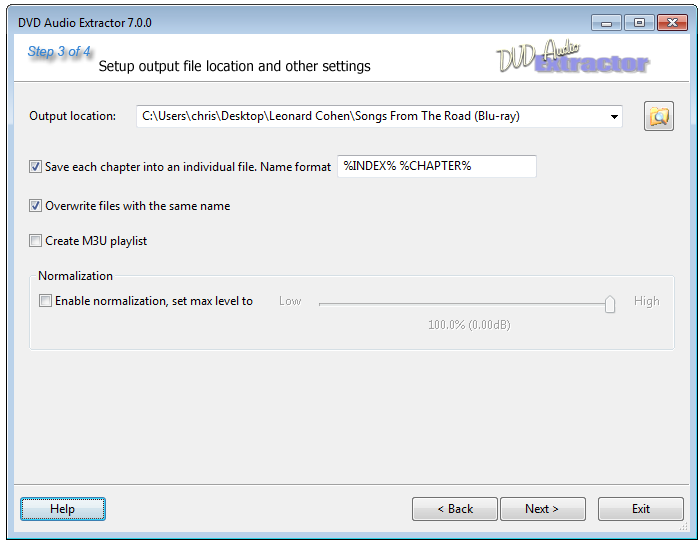
Step 3. Select the preferred Output location. I rip the files to my Desktop. Check the box to save each chapter into individual files. This eliminates the need to create a CUE sheet or split one large file into smaller files down the road. The Name format option doesn't allow much creativity but is good enough. The Name format box options include Artist, Album, Title, Chapter, and Index. This box must contain at least the Chapter or Index option or this error message 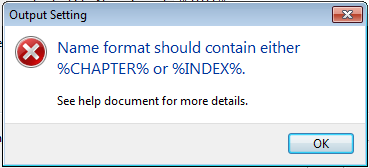 will appear on the screen. I use the %INDEX% %CHAPTER% options to name the files with a track number and track name. The track number option works only if all tracks on the album are ripped because the option simply numbers the files in order of extraction. Once the parameters are set click Next >
![]()
![]()
![]()
![]()
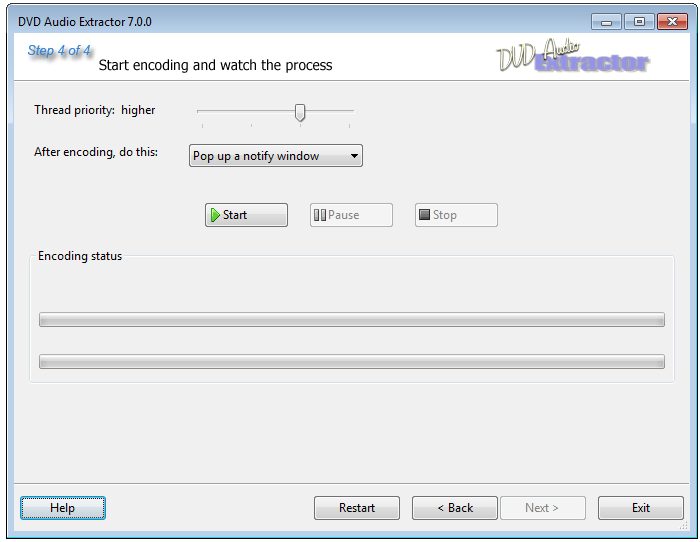
Step 4. Slide the Thread priority option over one notch to "higher" to give DVD Audio Extractor a bit more processing priority over other items running on the computer. Select Start
![]()
![]()
![]()
![]()
Step 5. Once the extraction is complete and as long as the option to "Pop up a notify window" is used, the following window will notify the user when the process is finished and will display a link to the extracted files.


![]()
![]()
![]()
![]()
Step 6. The files are now ready for import into one's music player of choice. DVD Audio Extractor doesn't allow embedding album art into the files. The simplest way to add this art is through a playback application such as JRiver Media Center or iTunes if ALAC was the selected output format.
Wrap Up
Ripping Blu-ray has never been easier although it has been cheaper. Paying for Passkey for Blu-ray and DVD Audio Extractor is well worth the expense because of the time these applications can save users. The learning curve is nearly nonexistent and the process of curating the files after extraction is very minimal. Once users have this simple Blu-ray ripping process mastered a new door to the world of high resolution concerts will open up and increase one's enjoyment of computer audio even more.
![]()
![]()
![]()


Recommended Comments