


At first blush ripping a Compact Disc with a computer seems like such a simple task. So simple that it can nonchalantly be done by someone from eight to eighty years old. Putting a CD into a Macintosh computer automatically launches iTunes. By default iTunes can automatically start ripping the CD to the hard drive and eject the disc when it's finished. Listeners seeking the ultimate in convenience and immediate results should select this method of ripping. Note the two words "in" and "convenience" next to each other in the previous sentence. That choice of words was not by accident. Using the aforementioned ripping method will lead to major inconvenience, lost music, and hours of precious time wasted. Ripping CDs, like everything in life, involves many choices and well thought out decisions if one wants to do it right the first time. There are simple ways, there are hard ways, and there are many ways in between the two extremes to rip a CD collection. What follows is the Computer Audiophile CD Ripping Strategy and Methodology. This manual details the Computer Audiophile strategy and method of ripping a CD collection and explains why this method is recommended.
Strategy & Methodology
The importance of a well thought out ripping strategy and defined methodology cannot be stressed enough. Without a solid strategy and solid methodology one is bound to lose countless hours of time and money by re-ripping CDs. In addition the inability to use an old CD ripped in an obscure format and the inability to find one's music stored in a mass of untagged files with no identifying data is a guarantee for those who dive in head first without forethought. Fortunately most of these pitfalls can be avoided by following the recommendations in this document. Note: This manual covers software strategy and methodology. Hardware considerations will be addressed in another document.
Computer Audiophile CD Ripping Strategy
Strategy |?strat?j?|
Noun ( pl. -gies)
A plan of action or policy designed to achieve a major or overall aim.
The mindset needed for someone about to rip an entire Compact Disc collection must be that of a preservationist seeking to preserve a piece of art, music on a disc, by creating the most accurate copy possible. Before embarking down the ripping road one must develop a clear strategy. Developing a clear strategy requires a goal. The goal here begins with a definition of digital preservation. Digital preservation is defined as: long-term, error-free storage of digital information, with means for retrieval and interpretation, for the entire time span the information is required [1]. Applying this definition specifically to ripping Compact Discs brings the goal a bit more into focus.
A. Long-term can be indefinite according to The Reference Model for an Open Archival Information System (OAIS) Principles of digital preservation.
B. Error-free storage of digital information in this context is equivalent to error free digital copies of Compact Discs on a storage medium not prone to errors itself. Terms associated with error free ripping are secure rips, accurate rips, and error correction among many others.
C. The means of retrieval, in the context of ripped CDs, literally means actual access to the ripped files on a hard drive or other storage medium readable by computers available when the data is needed. Expanding beyond the literal sense, the word retrieval necessitates the ability to retrieve audio and playback it back from the file itself. Think of file formats that can be used today and the chances of support for these formats in the future.
D. The term interpretation relates partially to the previous concept of retrieval because one's application must be able to interpret the file format. Interpretation also relates to metadata and how one interprets specific files or albums among a sea of similar looking data. Interpretation is synonymous with explanation and here the metadata explains what one is looking at by clearly stating the track name, album name, and artist name in addition to many other tags.
E. The Time span this information is required is up to each person. The times span may be until a specific file can no longer be played by any available hardware or software or until a specific file format can be converted into another format that meets the aforementioned goals. The time span that one wants to keep around that old Mili Vanili <a href="http://en.wikipedia.org/wiki/Girl_You_Know_It%27s_True">Girl You Know It's True</a> album may have nothing to do with technology and more to do with one's pride.
Closely tied to digital preservation is digital sustainability. This is a continual process focused on building an infrastructure and approach that is flexible with an emphasis on interoperability. Digital sustainability incorporates activities in the present that will facilitate access and availability in the future.[2] In the context of this document flexibility, interoperability, and access and availability in the future are key concepts. The end result of this strategy and methodology must be a music collection that embodies all of these terms.
In addition to the somewhat scholarly definitions listed above one must keep in mind that ripping CDs is done to enjoy one's music collection via a music server. Album art, immediate access to long lost tracks, great sound, and playlists are paramount. Thus, the stated goal must incorporate as much of these needs as those of a digital preservationist.
Stated Goal
The concise goal is to rip one's CDs accurately, to a reliable storage medium, in a file format that's as future resistant as possible, with metadata, for use as long as one requires. In layman's terms, "Do it right the first time." Doing things right the first time often involves more work up front but increases usability and saves time and money down the road. The Computer Audiophile ripping strategy is no different.
Accomplishing The Goal
The Computer Audiophile strategy to accomplish this goal requires more than a single copy of one's music collection. I've adapted a concept from Peter Copeland's, dated but still relevant, Manual of Analogue Sound Restoration Techniques to more appropriately fit an audiophile's needs. The number of copies of one's music collection should be no less than two and may reach four depending on one's preferences.
(1) The original Compact Disc should be kept as long as possible.
(2) A ripped bit for bit "Archival Copy” of the CD only used to produce other copies, not used for playback.
(3) A ripped bit for bit "Working Copy" of the CD used for everyday playback.
(4) An optional "Edited Copy" that may contain volume leveling, EQ settings, or additional alterations to the data.
The original Compact Disc should not be discarded as it is the only real reference version of the specific album. As good as current ripping techniques are they may not be able to completely clone a Compact Disc according to the late Peter Copeland, former Conservation Manager at the British Library Sound Archive. Readers thinking about sending their music collection off to a service that rips the CDs in exchange for keeping the physical disc are strongly discouraged from this accident waiting to happen.
Ripping the CD as accurately as possible is a critical piece of this ripping strategy. Accurate equates to ripping the Compact Disc in its native resolution 16-bit / 44.1 kHz. Frequently readers of Computer Audiophile have asked about ripping CDs to a higher sample rate such as 24-bit / 48 kHz. Ripping to anything other than 16/44.1 does not preserve an accurate "Archival Copy" of the CD. An inaccurately ripped copy leaves no future options to produce a bit for bit version of the original CD. If one wants a 24/48k version of a CD, it can be created any time from the ripped 16/44.1 version. While it is technically very possible to downsample from a higher resolution than 16/44.1 there are unavoidable mathematical algorithms for rounding numbers during the conversion and each downsampling program operates differently. Thus a downsampled version will likely never equal an exact "Archival Copy" ripped at 16/44.1. In addition to ripping the CD in its native resolution one must use a ripping program that offers a secure ripping feature. This feature compares the checksum of the ripped file to that of others in a global online database. This ensures the rip is at least consistent with a number of other rips around the world. CDs that are not in such an online database are often ripped several times and the rips are compared to each other before the program will consider the rip secure and encode the track. More information about how to accomplish this is below in the methodology section.
Archival Copy, Working Copy, Edited Copy
Listening to music daily via a music server allows a lot of time to peruse one's music files via a playback application like iTunes or MediaMonkey. This also allows the listener plenty of opportunities to accidentally delete the files or do something, that can't be reproduced, that causes the files to disappear. In the second scenario the files are usually still there, but if the user can't find them the files are essentially gone. In addition to human error computer hardware is far from perfect. Hard drives fail whether they are traditional spinning drives or solid state drives. For these and many other reasons, it is recommended to keep an Archival Copy of one's music files and a Working Copy. The Archival Copy never changes. It is an "exact" replica of the original music on the disc. There is no chance of corrupting the files via usage or accidentally deleting them while browsing or cleaning up your collection. This Archival Copy should reside on a separate storage device from the working Copy. For example, storing the Archival Copy on a NAS drive and the Working Copy on a local drive is a solid solution. One should also think about off-site storage and stable storage media like tape, but that's a discussion for another day. In addition to the ripped files in the Archival Copy location it is recommended one keep downloadable PDF liner notes and the automatically generated ripping report with information about the success or failure of each ripped CD in this location. More information about generating an automatic ripping report is in the methodology section below. The Working Copy is just that, the bit for bit copy of music you work with and playback through your audio system. Changes can be made to this copy without worry. The Working Copy can be replaced easily from the Archival Copy. This may seem a little over the top at first, but in the long run it will save countless hours of time by avoiding the need to re-rip one's music collection. It will also save money for those who hire the ripping process out to a third party. There are a few ways to accomplish this double or triple rip that make it as easy as iTunes once setup correctly. This will be covered in the methodology section as well. Note: The Archival Copy will also be invaluable when the need arises to use a different file format. A detailed explanation of the reasoning behind this can be found below. An Edited Copy is totally optional and is likely not needed by many readers. In the days when EQ adjustments and volume normalization were unreversible this Edited Copy was more valuable. Nonetheless there may still be value in this fourth copy of one's music collection.
Metadata |?met??dat?; -?d?t?|
Noun
A set of data that describes and gives information about other data.
Metadata, commonly referred to as tags or the act of tagging, is essentially data about the data. For the purpose of the Computer Audiophile Ripping Strategy and Methodology metadata is all the information about an album, artist, song, etc... Without metadata songs are often titled Track 01, Track 02, and likely have no album art. Metadata is a huge enabler that nudges people down the music server path. Viewing all one's albums with artwork and track after track listings or playlists are all part of the experience. In addition to increasing usability now, metadata is critical for long term future viability of ripped material. Even if one follows this document closely up to this point and has an Archival Copy of all their music, it won't do much good if all the tracks are Track 01, all the albums are Untitled, and all the artists are Unknown. Another big part of using metadata is whether or not the metadata is embedded. Embedded means the music file itself stores all the metadata such as track names, artists names, album name, and album art. This is by far the preferred way to store metadata when ripping CDs. The other way metadata is stored is by associating this data with certain files, albums, and artists and keeping the information in a separate database or file. An example of this concept can be illustrated using iTunes. iTunes is capable of both embedding metadata and associating metadata with files. If one rips a CD in iTunes as AIFF files iTunes will embed the text metadata like track title, artist and album. If the iTunes Store sells the specific ripped album, iTunes will download the album art automatically but it will not be embedded. iTunes associates the album art with the specific album and places the picture in its unintelligible album art directory making it irretrievable in the future. iTunes is capable of embedding album art into the ripped AIFF files, but it must be done manually by adding the art via the track or album properties. Embedded v. associated metadata is not that big of a deal until one loses or wants to move or recreated a corrupt library. Embedded metadata moves with the files and appears in the new library without user intervention. Associated metadata is gone for good. In the example above the text metadata specifying album, artists, and track will remain with the file, but the associated album art will be lost because iTunes stored it in a folder instead of embedding the art. The importance of metadata ties nicely into the next topic, file formats.
File Format - Archival Copy
Recently I published an article recommending Computer Audiophile readers rip all their music as AIFF files. The ripping strategy outlined in this ripping manual is not a total departure from the previous recommendation rather it's an enhancement or expansion. The Computer Audiophile Ripping Manual recommends that all music ripped as the Archival Copy be ripped in FLAC format. The Working Copy file format depends on the operating system and playback application in use. Ripping the Archival Copy to bit for bit FLAC files enables one satisfy many of the principals of digital preservation and sustainability such as flexibility, interoperability, and access and availability in the future . Since FLAC (Free Lossless Audio Codec) is lossless it enables a 16/44.1 1:1 copy of the music. This satisfies the need to preserve the original work of art (music) in it's native format. Sure FLAC is not the format of the music on a Compact Disc, but it allows an identical bit for bit copy to be extracted from the FLAC file. The FLAC format is highly usable as it is and can be converted into virtually any format available as of this writing. FLAC is not future proof but it could be called future resistant. FLAC will likely be supported as long or longer than any of the current uncompressed or compressed lossless formats. The chances are also pretty high that when support for FLAC eventually fades there will be a readily available program to convert FLAC files into the successor format. The same cannot be said about proprietary formats. When decisions are made to benefit shareholders, think Apple and Microsoft, there is no telling what the future holds. That's neither good nor bad, it's just a fact of life. FLAC also supports metadata as good or better than any other format. All types of metadata can be embedded into FLAC files and this metadata is readable by almost all applications that support FLAC. (Songbird currently has problems reading embedded album art). Readability of FLAC files by applications is a trivial matter. FLAC has a standard that many formats like WAV and AIFF do not. As an example, when researching file formats I talked to application developers who all said FLAC is simple to support in playback applications. These developers also said WAV and AIFF each have many inconsistencies, such as the way a file header is written, that make it more difficult support. Two real world examples come to mind when I think of WAV files. Over the last year PS Audio and Boulder have finally succeeded in playing the Reference Recordings HRx 24/176.4 files back via their disc players. Many of the difficulties these companies had in development were related to the inconsistent way file headers were written in the WAV files. Again, FLAC files don't have this problem.
File Format - Working Copy
The file format of the Working Copy of one's music collection should address the specific needs of each user and does not need to be an open format as long as it's a 1:1 bit for bit copy. As a music lover and audiophile I recommend lossless and/or uncompressed formats only and will talk about these formats here. The file format selected is dependent on a combination of the operating system and playback application one will be using. Users of Mac OS X should rip the Working Copy of their music in AIFF format. AIFF supports embedded metadata usable by iTunes and is a 1:1 copy of the original work of art on the Compact Disc. AIFF is a fairly usable format for a few applications, although the metadata may not be widely usable. Many applications can still play AIFF if nothing else. I mention this because users frequently move files around to try playing music on mobile devices or a network streaming device at a friends house. AIFF should work OK in these situations. Additionally I don't believe there have been any changes to the AIFF format in years. The same cannot be said about CODECs like Apple Lossless Audio CODEC (ALAC). If one views the properties of ALAC files in iTunes, part of the metadata of the files lists what version of the CODEC was used to encode the file. With each new iTunes release there are likely changes made to this CODEC. Good, bad or harmless who knows but nonetheless there have been and will be more changes. I don't know what version of ALAC I would use as a reference to compare each successor or predecessor version. I have not personally tested this myself but some readers have reported hearing differences between files ripped with the new and old versions of the ALAC CODEC. Voodoo or not it's al least something to consider. Users of Microsoft Windows based computers have two reasonable choices for ripping their Working Copy. If the user needs the best embedded metadata I recommend ripping the Working Copy to FLAC. This is against my strong preference for uncompressed files during playback, but it's the only way to go if embedded metadata is critical. If the user can live with the high likelihood of losing the metadata for the Working Copy and wants to guarantee the best sound quality then the recommended format is WAV. This does change my previous recommendation of using AIFF on a PC. Because WAV support is so widespread on PCs and AIFF metadata is not supported very well on PCs it is recommended to use WAV. The suggestion that the best sound quality for PCs comes from WAV files is not uncontroversial and is a conclusion I encourage everyone to come to on their own. It is my opinion that playing WAV files will not hurt the sound quality. The same file portability and interoperability as AIFF files is also pertinent to WAV files. The one caveat with a Working Copy full of WAV files is that the very limited support of embedded metadata will eventually cause one to lose this metadata. For example, using MediaMonkey with WAV files one can associate metadata and album art with the files. However, if one wants to switch applications or if the MediaMonkey database is lost or becomes corrupt much of the metadata is gone. It is often said that WAV files do not support embedded metadata. This is not a 100% correct statement as I believe there is room for embedded metadata within the WAV format. I've had inconsistent results with embedded metadata and WAV files. Album artwork is one that I've had the most problems with. Embedded v. associated metadata is a major concern that shouldn't be taken lightly.
File Format - Edited Copy
This is completely open to any uncompressed, lossless, or lossy format one selects.
The Computer Audiophile ripping strategy in its simplest form comes down to four points (listed below). This strategy is the first step toward accomplishing the goal of ripping one's CDs accurately, to a reliable storage medium, in a file format that's as future resistant as possible, with metadata, for use as long as one requires. With this strategy in hand one must execute a solid methodology to accomplish the goal 100%.
Summary of the Computer Audiophile CD Ripping Strategy
1. Rip in 16/44.1 for a 1:1 copy of the original.
2. Rip an Archival Copy and a Working Copy in addition to keeping the original Compact Disc.
3. Embed metadata for usability now and data retrieval and interpretation in the future.
4. Use open file formats for flexibility and interoperability in the future.
Computer Audiophile CD Ripping Methodology
methodology |?me???däl?j?|
noun ( pl. -gies)
a system of methods used in a particular area of study or activity.
A simplified explanation of the Computer Audiophile Ripping Methodology: Use dBpoweramp in secure mode to rip CDs at 16/44.1, outputting two or three different file formats simultaneously to different disks.
Executing the Computer Audiophile Ripping Strategy is much easier than one might think. The following methodology accomplishes the stated goal in one fell swoop. There are a few applications available that are just as capable as the one recommended in this document. Readers are encouraged to experiment on their own and select an application they are comfortable using. It is critically important that one sets one's self up for success when it comes to tasks like ripping a complete music collection. These boring, menial, and mindless tasks lead to cutting corners and taking the easy road unless one is setup for success. Ripping three copies of each disc will soon lead to one copy if the process is not streamlined and convenient. I recommend setting up a Windows computer that is always ready to rip CDs, like a ripping station with dBpoweramp ripping profiles ready to go. This way coming home from the store with five CDs doesn't lead to abandonment of this whole process because one wants to listen right away. No reconfiguring of the computer will be necessary and ripping the Computer Audiophile way will require the same amount of work as ripping the "traditional" way.
Computer Audiophile CD Ripping Methodology Requirements
1. Windows based computer (XP, Vista, 7)
2. Adequate internal hard drive space
3. Adequate external hard drive space on a NAS, USB, FireWire, or e-Sata disk.
4. dBpoweramp Music Converter software, AIFF, WAV, and FLAC CODECS, Multi Encoder Utility
Step By Step
The following instructions show readers how I rip CDs to a Windows XP computer, a Mac Pro, and a NAS drive simultaneously. The Windows XP music server will contain a Working Copy as WAV files, the Mac G5 will contain a Working Copy as AIFF files, and the NAS will contain an Archival Copy as FLAC files. Note: My Windows XP computer does double-duty as my ripping PC and music server.
Windows XP - WAV files for Working Copy
Mac G5 OS X - AIFF files for Working Copy
NAS - FLAC files for Archival Copy
1. Setup for success with a ripping computer ready to go whenever it's needed.
2. Setup folders on an external drive and/ or another music server to receive the ripped files.
On the NAS drive create a folder called Archival Copy to receive FLAC files. On the Mac G5 running OS X 10.4 Tiger enable Windows Sharing (simply called File Sharing on OS X 10.6 Snow Leopard). The Windows PC already has a My Music folder accessible by dBpoweramp.
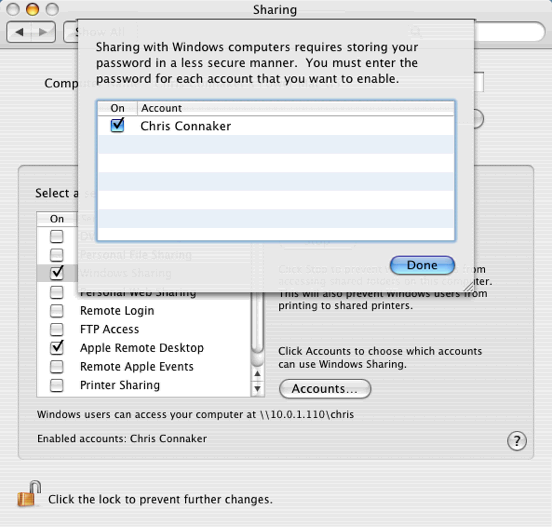
Using OS Tiger X 10.4 enter System Preferences >> Sharing and enable Windows Sharing by checking the box to the left. Then click Accounts and enable at least one account.
<a href="http://images.computeraudiophile.com/graphics/2009/1029/tiger-sharing-01-original.png" title="Tiger OS X 10.4 Sharing" class="thickbox" rel="tiger-sharing-gallery"><img src="http://images.computeraudiophile.com/graphics/2009/1029/tiger-sharing-01-33.png" alt="tiger 001" ></a> <a href="http://images.computeraudiophile.com/graphics/2009/1029/tiger-sharing-02-original.png" title="Tiger OS X 10.4 Sharing" class="thickbox" rel="tiger-sharing-gallery"><img src="http://images.computeraudiophile.com/graphics/2009/1029/tiger-sharing-02-33.png" alt="tiger 002" ></a>
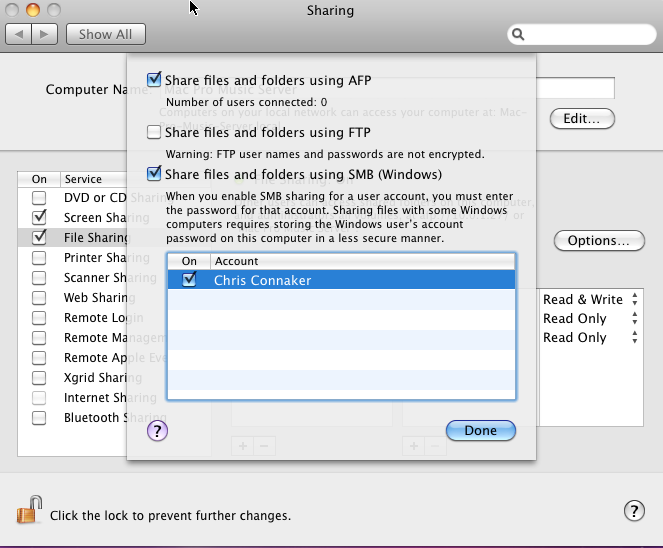
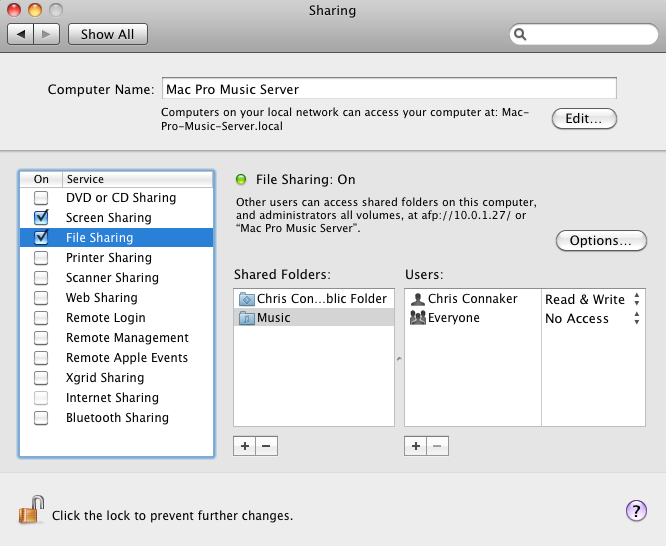
Using OS X Snow Leopard enter System Preferences >> Sharing and enable File Sharing by checking the box to the left. Then click the + symbol underneath the Shared Folders box. On the following screen select the Mac's Music folder and enable Share files and folders using SMB (Windows) as well as enabling at least one user account. Click Done and make sure the the Music folder is now listed in the Shared Folders box with Read & Write Access listed to the right of the newly enabled user account.
<a href="http://images.computeraudiophile.com/graphics/2009/1029/snow-leopard-sharing-01-original.png" title="SL OS X 10.6 Sharing" class="thickbox" rel="sl-sharing-gallery"><img src="http://images.computeraudiophile.com/graphics/2009/1029/snow-leopard-sharing-01-33.png" alt="sl 001" ></a> <a href="http://images.computeraudiophile.com/graphics/2009/1029/snow-leopard-sharing-02-original.png" title="SL OS X 10.6 Sharing" class="thickbox" rel="sl-sharing-gallery"><img src="http://images.computeraudiophile.com/graphics/2009/1029/snow-leopard-sharing-02-33.png" alt="sl 002" ></a> <a href="http://images.computeraudiophile.com/graphics/2009/1029/snow-leopard-sharing-03-original.png" title="SL OS X 10.6 Sharing" class="thickbox" rel="sl-sharing-gallery"><img src="http://images.computeraudiophile.com/graphics/2009/1029/snow-leopard-sharing-03-33.png" alt="sly 003" ></a>
3. Download and install dBpoweramp, AIFF CODEC, and Multi Encoder Utility (WAV & FLAC included by default). These are three separate files with simple installation procedures. Download and double-click the file.
Program - http://www.dbpoweramp.com/download.htm
AIFF - http://www.dbpoweramp.com/codec-central-aiff.htm
Multi Encoder - http://www.dbpoweramp.com/codec-central-utility.htm
4. Configure dBpoweramp general settings.
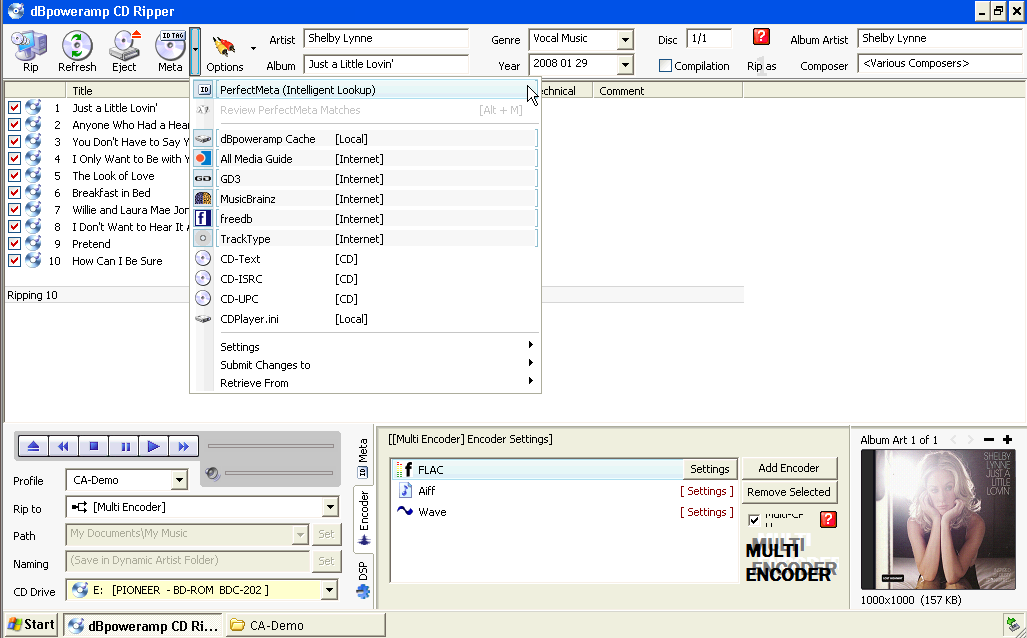
Launch dBpoweramp CD Ripper. Make sure PerfectMeta )Intelligent Lookup) is enabled. It may not be obvious but one needs to select the little down arrow to the right side off the Meta button for this menu to appear.
<a href="http://images.computeraudiophile.com/graphics/2009/1029/dbp-perfect-meta-original.png" title="dBp PerfectMeta" class="thickbox" rel="dBp-perfectmeta-gallery"><img src="http://images.computeraudiophile.com/graphics/2009/1029/dbp-perfect-meta-33.png" alt="dBp 001" ></a>
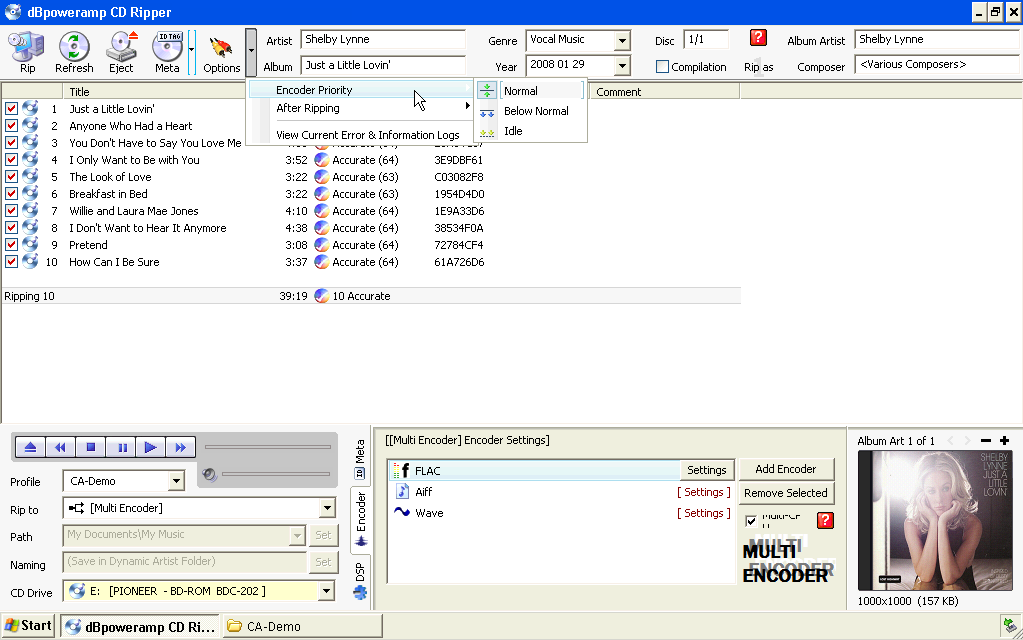
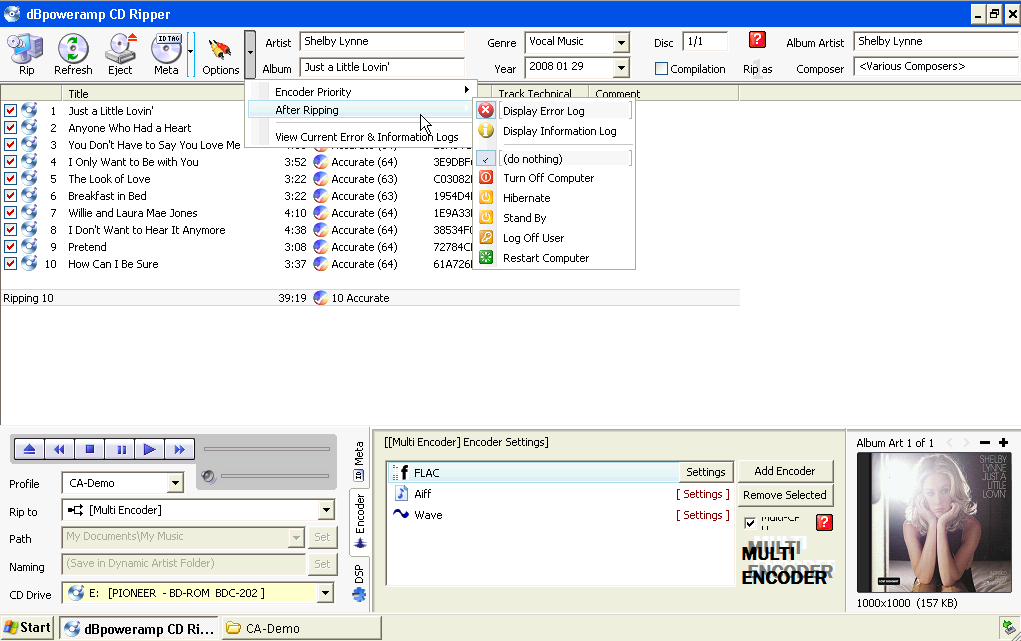
Next click the little arrow next to the Options button go to Encoder Priority and make sure the highest priority available is selected. Then select After Ripping and make sure Display Error Log and Do Nothing are enabled. This allows an error log to pop-up after a rip goes awry. It's nice to know as soon as possible in addition to having the detailed log file in the Archival Copy album folder.
<a href="http://images.computeraudiophile.com/graphics/2009/1029/dbp-encoder-priority-original.png" title="dBp Encoder Priority" class="thickbox" rel="dBp-encoder-priority-gallery"><img src="http://images.computeraudiophile.com/graphics/2009/1029/dbp-encoder-priority-33.png" alt="dBp 003" ></a> <a href="http://images.computeraudiophile.com/graphics/2009/1029/dbp-after-ripping-original.png" title="dBp Encoder Priority" class="thickbox" rel="dBp-encoder-priority-gallery"><img src="http://images.computeraudiophile.com/graphics/2009/1029/dbp-after-ripping-33.png" alt="dBp 004" ></a>
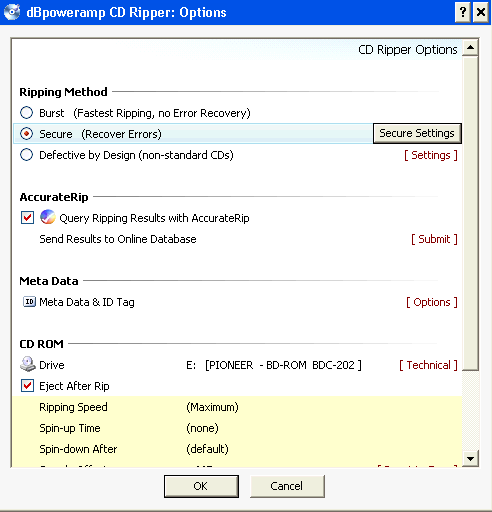
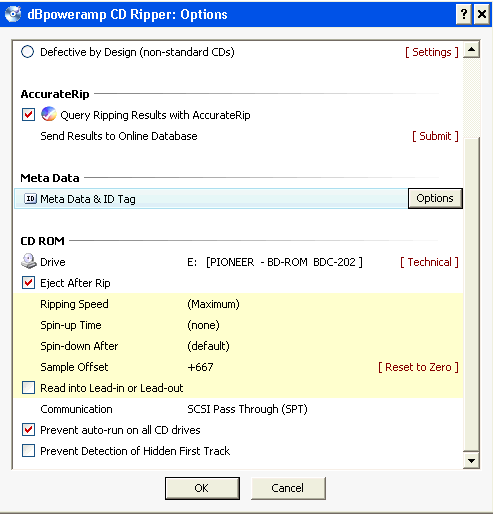
To configure the dBpoweramp ripping options click the large Options button. The options I use are Secure (Recover Errors), AccurateRip, and Eject After Rip.
<a href="http://images.computeraudiophile.com/graphics/2009/1029/dbp-rip-opt-01-original.png" title="dBp Secure" class="thickbox" rel="dBp-secure-gallery"><img src="http://images.computeraudiophile.com/graphics/2009/1029/dbp-rip-opt-01-33.png" alt="dBp secure 001" ></a>
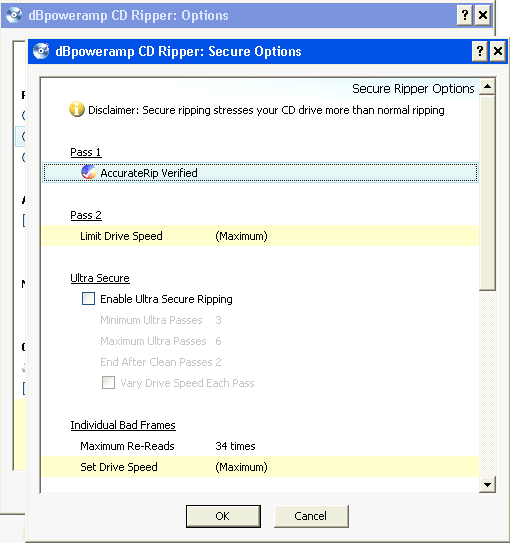
I don't Enable Ultra Secure Ripping because there comes a point when enough is enough. If I actually thought three to six rips were needed for my collection to be better then I would consider enabling this option. It's possible I may gather my tough to rip damaged CDs and rip a batch of them in Ultra Secure mode. Doing this will take a serious investment of time as one CD rip can last twenty-four hours if the disc is in bad enough shape. Up to this point I have been very satisfied with standard secure ripping and having my results verified by the checksum with the online database.
<a href="http://images.computeraudiophile.com/graphics/2009/1029/dbp-rip-opt-02-original.png" title="dBp Ultra Secure" class="thickbox" rel="dBp-ultra-secure-gallery"><img src="http://images.computeraudiophile.com/graphics/2009/1029/dbp-rip-opt-02-33.png" alt="dBp ultra secure 001" ></a>
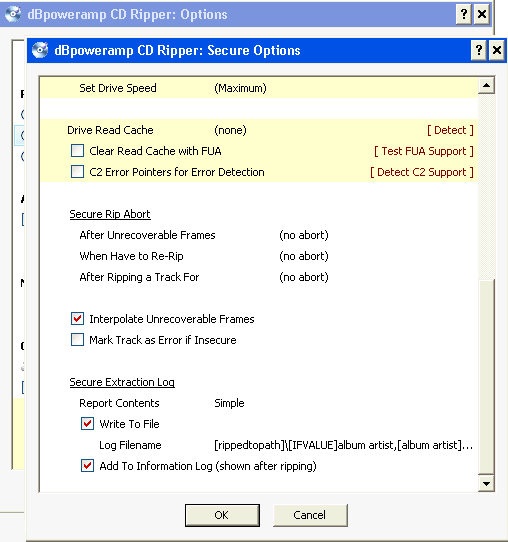
The word Interpolation frequently has a bad connotation with audiophiles. Interpolation is a method by which the ripping program inserts an intermediate value or term into a series by estimating or calculating it from surrounding known values[4]. For example if one has a an unreadable spot on a CD named Frame B, the ripping program with interpolation enabled will use Frame A and Frame C to estimate what should have been read from Frame B and use that new value. This does present questions about preserving the actual CD content as perfect as possible. I look at it this way, the interpolated frame is more likely to sound like the actual recording from an undamaged disc than a pop or tick would sound without an interpolated frame. If the damaged disc in question is a one of a kind piece of history one obviously make two copies one with and one without interpolation. I don't recommend making the Archival Copy using the Computer Audiophile Methodology without interpolation. To the best of my knowledge there is no way to interpolate during a file conversion if one wants to create an AIFF copy from the Archival FLAC copy. Thus every subsequent copy would have a pop or tick in the un-interpolated frame position.
In addition to interpolation, this is where one enables the Write To File option. When this is enabled a file will be written to the album folder for the currently ripped disc. This file is great to keep in the Archival Copy as it explains if anything hen wrong with the rip and more. I use this when I think I hear a click or pop in a song. Looking at this log provide a data point to help me decide is I am hearing something real or not or if it's just part of the recording.
<a href="http://images.computeraudiophile.com/graphics/2009/1029/dbp-rip-opt-03-original.png" title="dBp Interpolation" class="thickbox" rel="dBp-interpolation-gallery"><img src="http://images.computeraudiophile.com/graphics/2009/1029/dbp-rip-opt-03-33.png" alt="dBp interpolation 001" ></a>
<a href="http://files.computeraudiophile.com/2009/1029/Shelby-Lynne-Just-a-Little-Lovin.txt">Click here for log file example</a>
Two nice features I enable are Eject After Rip and Prevent auto-run on all CD drives. Th first is handy when I am not paying attention. The opening disc tray usually grabs my attention better than anything else. Preventing auto-run of CDs is very nice so Windows or another program does not launch an unwanted interruption every time a new disc is inserted. Neither of these are absolutely necessary, but I think they are part of setting one's self up for success.
<a href="http://images.computeraudiophile.com/graphics/2009/1029/dbp-rip-opt-04-original.png" title="dBp Eject" class="thickbox" rel="dBp-eject-gallery"><img src="http://images.computeraudiophile.com/graphics/2009/1029/dbp-rip-opt-04-33.png" alt="dBp eject 001" ></a>
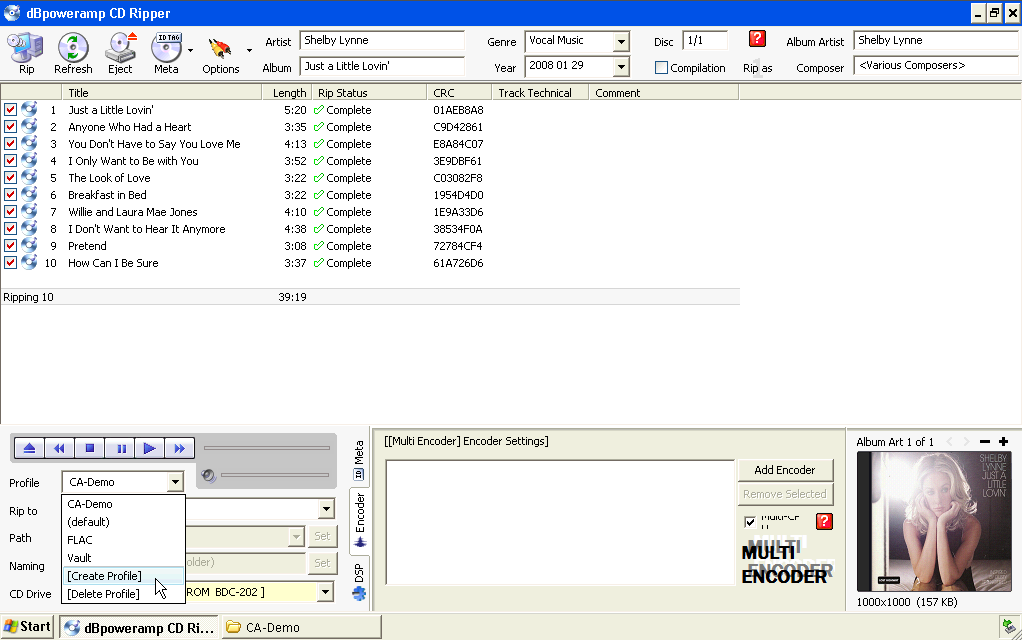
5. Create a ripping profile for quick access to different ripping settings..
In the lower left corner of the dBpoweramp window click the drop down arrow next to Profile and select [Create Profile]. In the pop-up box give this profile a name.
<a href="http://images.computeraudiophile.com/graphics/2009/1029/dbp-profile-01-original.png" title="dBp Create Profile" class="thickbox" rel="dBp-create-profile-gallery"><img src="http://images.computeraudiophile.com/graphics/2009/1029/dbp-profile-01-33.png" alt="dBp create profile 001" ></a>
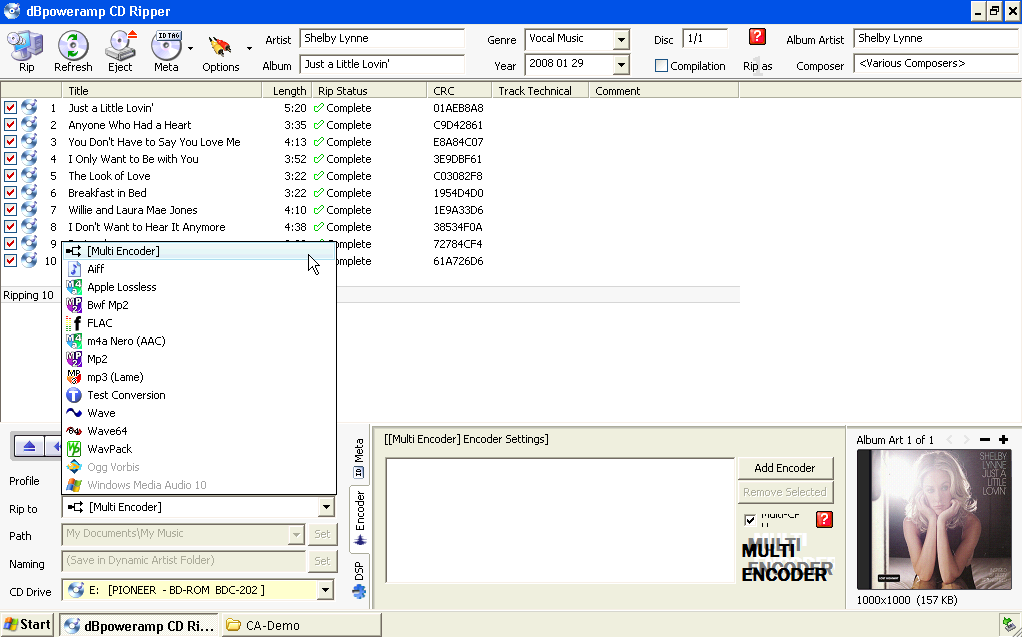
Configure all the ripping settings for this profile. Remember the need for three file formats in three different locations for my two music servers and one Archival Copy on a NAS. This is where the Multi Encoder utility installed earlier comes into play. Select the drop down arrow to the right of the words Rip To, then select [Multi Encoder]
<a href="http://images.computeraudiophile.com/graphics/2009/1029/dbp-profile-02-original.png" title="dBp Configure Profile" class="thickbox" rel="dBp-configure-profile-gallery"><img src="http://images.computeraudiophile.com/graphics/2009/1029/dbp-profile-02-33.png" alt="dBp configure profile 001" ></a>
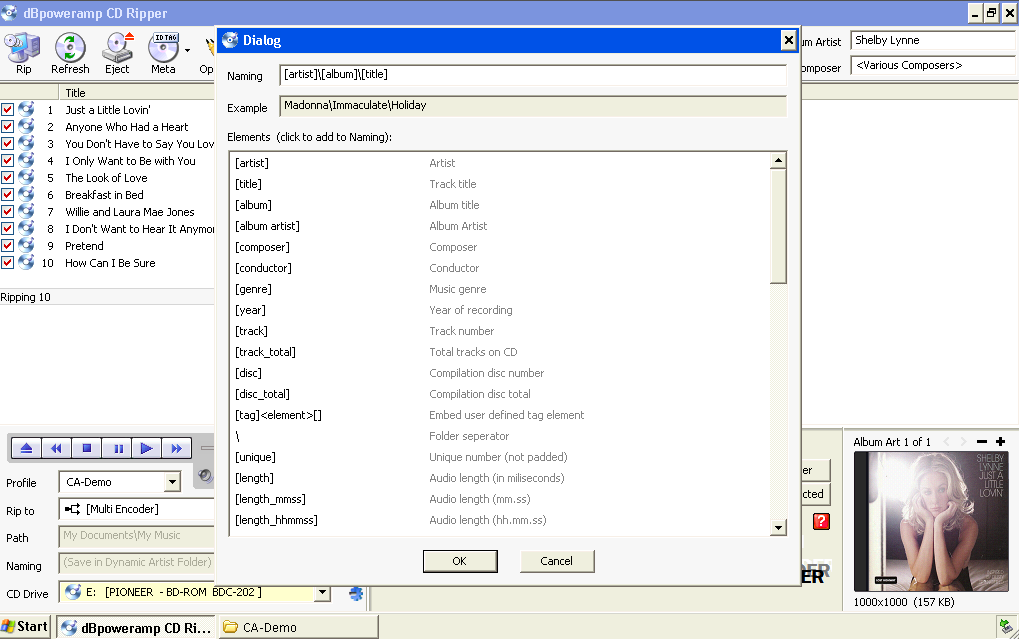
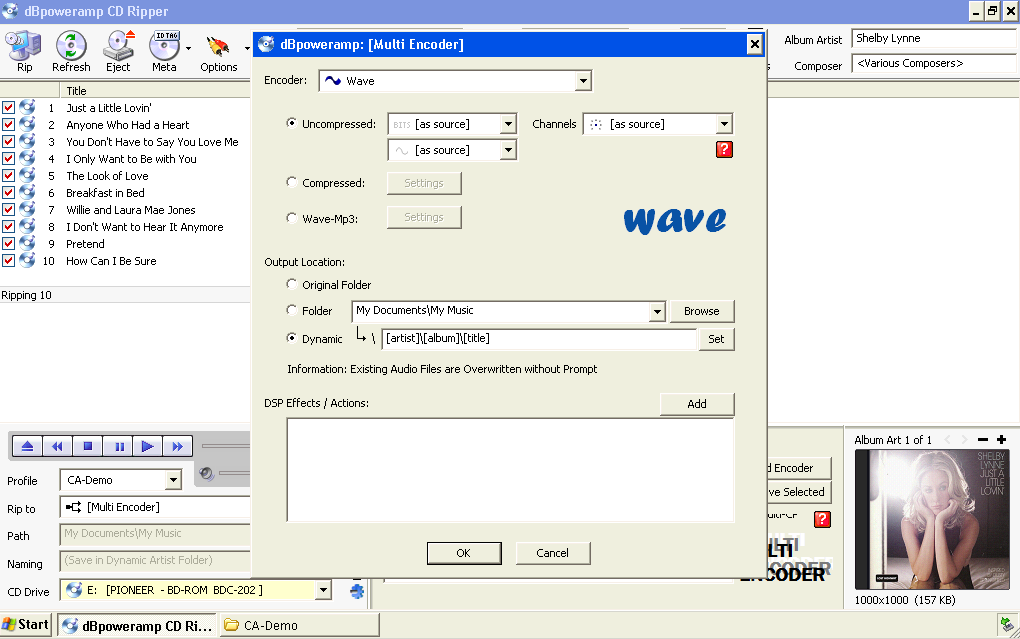
In the middle box at the bottom of the dBpoweramp windows is where the file formats will displayed once configured. Click the Add Encoder button on the right side of this box. Select FLAC as the encoder as this will be the Archival Copy. I select Compression Level 0 (Fast) because I recommend using FLAC for all its other great features, not its compression algorithms. It's OK to compress these files if one chooses. Check the box to Verify Written Audio after encoding. The Output Location must point to an external drive, in this example the M: drive is my NAS and Archival Copy is the folder on the NAS that was crated back in step two. Select Dynamic to give the artists, albums, and tracks a directory structure that works for a give use. Clicking the Set button allows one to customize this directory structure. By default all the tracks are put into one folder with the artist's name and the tracks have the album and track name in their titles. I prefer to have a folder hierarchy with the artists at the top level, then a folder for each album, and the individual tracks within each album folder. The Dialog box pictured here has all the choices for choosing a directory structure. One can get creative and very granular.
<a href="http://images.computeraudiophile.com/graphics/2009/1029/dbp-profile-03-original.png" title="dBp Add FLAC" class="thickbox" rel="dBp-ad-flac-gallery"><img src="http://images.computeraudiophile.com/graphics/2009/1029/dbp-profile-03-33.png" alt="dBp add flac 001" ></a> <a href="http://images.computeraudiophile.com/graphics/2009/1029/dbp-profile-04-original.png" title="dBp Add FLAC" class="thickbox" rel="dBp-ad-flac-gallery"><img src="http://images.computeraudiophile.com/graphics/2009/1029/dbp-profile-04-33.png" alt="dBp add flac 002" ></a>
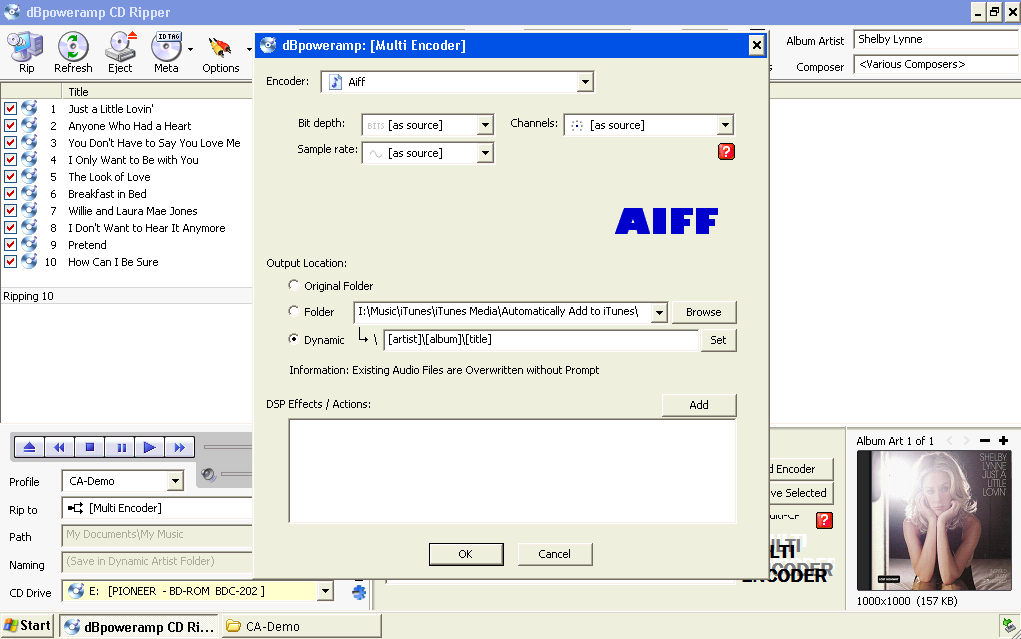
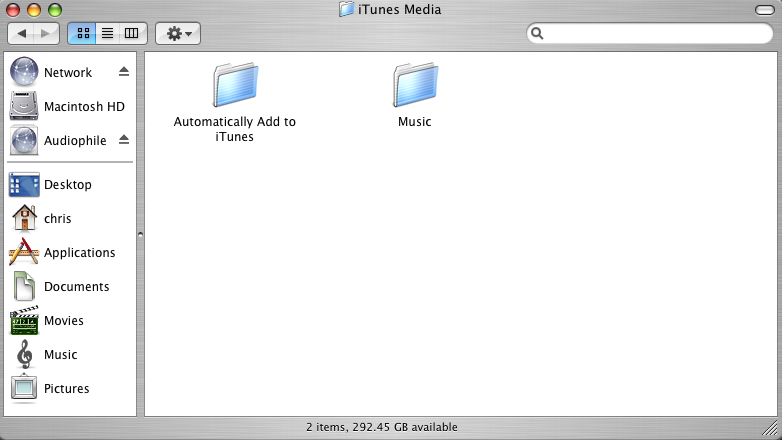
Add the AIFF encoder, leaving the bit depth, sample rate, and channels the Same As Source. The folder location selected here is the Automatically Add To iTunes folder on my Mac G5 music server. This folder was shared back in step two. After the files are ripped to this folder one has to open iTunes on the Mac G5 server and the tracks automatically get added to the iTunes library and removed from the Add To… folder. Don't rip to this location with iTunes open on the Mac G5 as I have run into problems of corrupted tracks and tracks not importing.
<a href="http://images.computeraudiophile.com/graphics/2009/1029/dbp-profile-05-original.png" title="dBp Add AIFF" class="thickbox" rel="dBp-ad-aiff-gallery"><img src="http://images.computeraudiophile.com/graphics/2009/1029/dbp-profile-05-33.png" alt="dBp add aiff 001" ></a> <a href="http://images.computeraudiophile.com/graphics/2009/1029/tiger-auto-add-folder-original.png" title="dBp Add AIFF" class="thickbox" rel="dBp-ad-aiff-gallery"><img src="http://images.computeraudiophile.com/graphics/2009/1029/tiger-auto-add-folder-33.png" alt="dBp add aiff 002" ></a> <a href="http://images.computeraudiophile.com/graphics/2009/1029/tiger-auto-add-folder-filled-original.png" title="dBp Add AIFF" class="thickbox" rel="dBp-ad-aiff-gallery"><img src="http://images.computeraudiophile.com/graphics/2009/1029/tiger-auto-add-folder-filled-33.png" alt="dBp add aiff 003" ></a>
Add the WAVE encoder, leaving the bit depth, sample rate, and channels the Same As Source. This folder location is the My Music folder on the local computer's hard drive. I use my ripping computer as my Windows XP music server as well. I use the same artist, album, track [title] directory structure here as I did in the previous folders.
<a href="http://images.computeraudiophile.com/graphics/2009/1029/dbp-profile-06-original.png" title="dBp Add WAVE" class="thickbox" rel="dBp-ad-wave-gallery"><img src="http://images.computeraudiophile.com/graphics/2009/1029/dbp-profile-06-33.png" alt="dBp add wave 001" ></a>
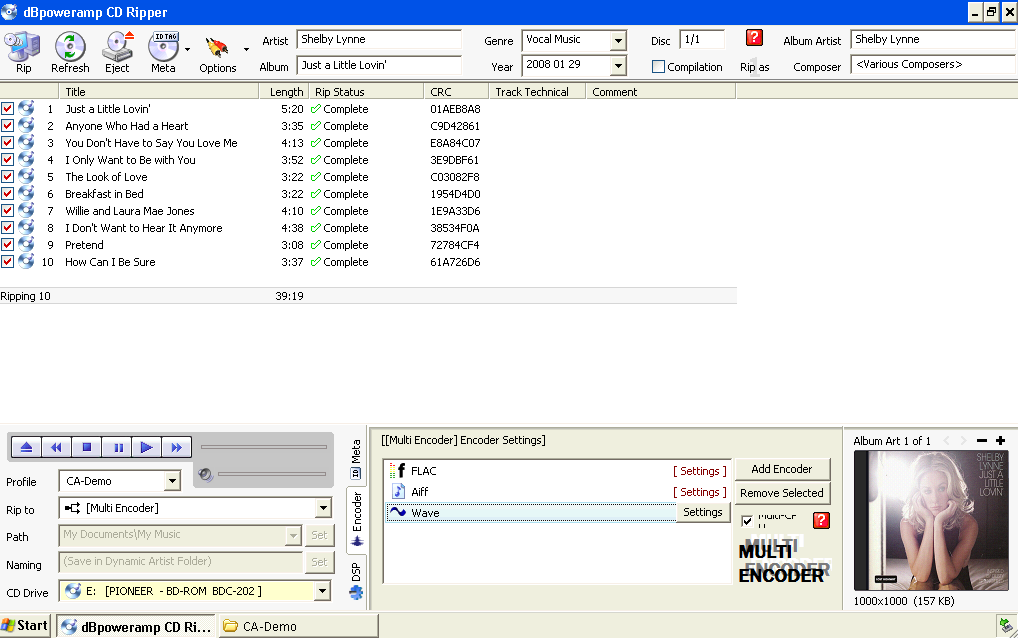
Once the profile is completely setup the Multi Encoder settings will look like the following graphic with FLC, AIFF, and WAVE in the box and all configured.
<a href="http://images.computeraudiophile.com/graphics/2009/1029/dbp-profile-07-original.png" title="dBp Multi Encoder" class="thickbox" rel="dBp-multi-gallery"><img src="http://images.computeraudiophile.com/graphics/2009/1029/dbp-profile-07-33.png" alt="dBp multi 001" ></a>
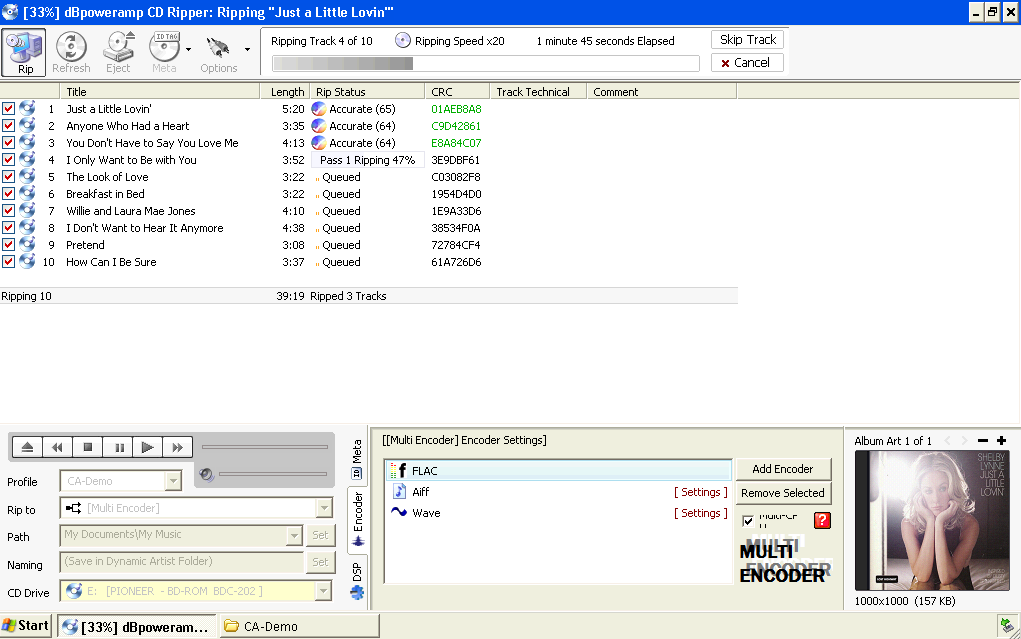
6. Click the Rip button in the upper left corner and sit back while the Computer Audiophile CD Ripping Methodology does all the work from here on out. The first graphic shows dBpoweramp in the middle of the ripping process. The green letters and numbers below the column CRC indicate the track has been ripped and the checksum matches that of others in the database. The number in parenthesis in the Rip Status column next to AccurateRip indicates, "The rip had no detectable errors and agrees with [X number of] other people (they have ripped the same track and had the exact same result), an agreement from AccurateRip ensures an error free rip" according to the dBpoweamp website. The second graphic displays what dBpoweramp considers a perfect rip with ten Accurate tracks out of ten possible.
<a href="http://images.computeraudiophile.com/graphics/2009/1029/dbp-rip-02-original.png" title="dBp Ripping" class="thickbox" rel="dBp-ripping-gallery"><img src="http://images.computeraudiophile.com/graphics/2009/1029/dbp-rip-02-33.png" alt="dBp ripping 001" ></a> <a href="http://images.computeraudiophile.com/graphics/2009/1029/dbp-rip-01-original.png" title="dBp Ripping" class="thickbox" rel="dBp-ripping-gallery"><img src="http://images.computeraudiophile.com/graphics/2009/1029/dbp-rip-01-33.png" alt="dBp ripping 002" ></a>
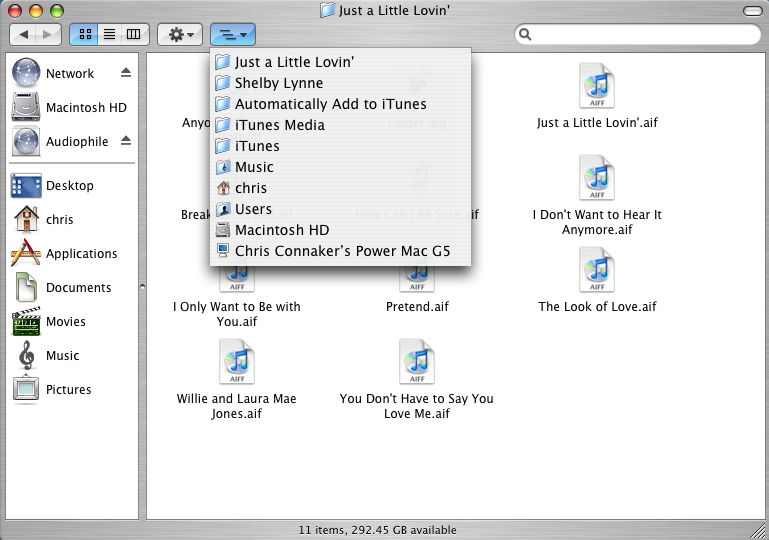
7. Check the rips to make sure everything worked as planned. Before opening iTunes on the G5 one can look in the Auto Add folder to check if the freshly ripped album is located in the right place. As soon as iTunes is opened these tracks will disappear into the iTunes hierarchy of folders leaving the Auto Add folder either empty or with a folder of unimproved tracks. The reasons for not importing a track can be many, some times the folder contains album artwork that doesn't get imported anyway. Thus no worries.
<a href="http://images.computeraudiophile.com/graphics/2009/1029/tiger-auto-add-folder-filled-original.png" title="dBp Auto Add To iTunes" class="thickbox" rel="dBp-auto-gallery"><img src="http://images.computeraudiophile.com/graphics/2009/1029/tiger-auto-add-folder-filled-33.png" alt="dBp auto 001" ></a> <a href="http://images.computeraudiophile.com/graphics/2009/1029/tiger-auto-add-folder-original.png" title="dBp Auto Add To iTunes" class="thickbox" rel="dBp-auto-gallery"><img src="http://images.computeraudiophile.com/graphics/2009/1029/tiger-auto-add-folder-33.png" alt="dBp auto 002" ></a>
Windows My Music Working Copy in WAV format.
<a href="http://images.computeraudiophile.com/graphics/2009/1029/windows-my-music-original.png" title="dBp My Music" class="thickbox" rel="dBp-my-gallery"><img src="http://images.computeraudiophile.com/graphics/2009/1029/windows-my-music-33.png" alt="dBp my 001" ></a>
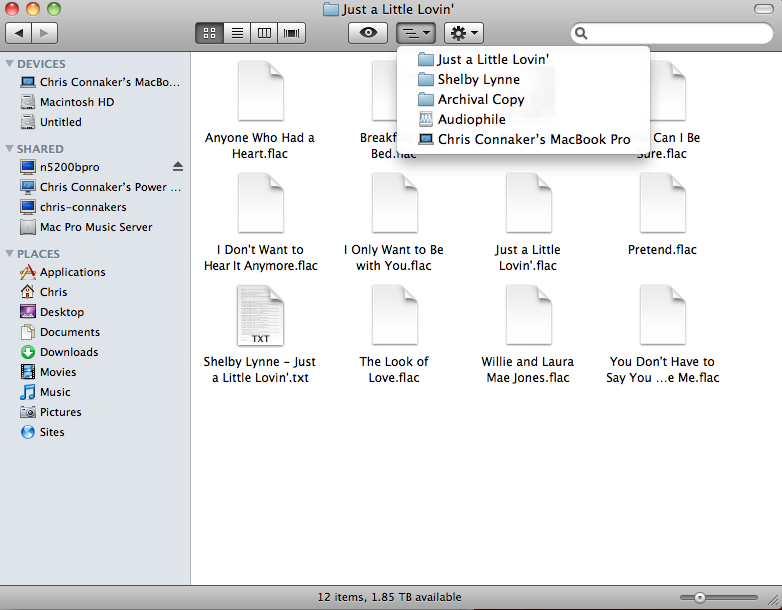
NAS archival copy in FLAC format.
<a href="http://images.computeraudiophile.com/graphics/2009/1029/NAS-archival-copy-original.png" title="dBp Archive" class="thickbox" rel="dBp-archive-gallery"><img src="http://images.computeraudiophile.com/graphics/2009/1029/NAS-archival-copy-33.png" alt="dBp archive 001" ></a>
8. Leave the Archival Copy, import the Working Copies into the playback applications of choice. That's it, The Computer Audiophile CD Ripping Strategy and Methodology is now in place.
Summary of the Computer Audiophile CD Ripping Methodology
Once readers go through the initial setup and rip a few CDs they'll realize this methodology isn't difficult to use and understand. Again in simple terms, use a Windows PC with dBoweramp to securely rip CDs at 16/44.1 into three formats simultaneously on to three different disks. When setup for success this methodology is just as easy as ripping with iTunes and offers a tremendous amount of advantages over iTunes.
Ripping Wrapping Up
The Computer Audiophile CD Ripping Strategy and Methodology, if followed, allows one to reach the goal stated at the beginning of this document. " To rip one's CDs accurately, to a reliable storage medium, in a file format that's as future resistant as possible, with metadata, for use as long as one requires." This methodology also ensures readers are not full time digital preservationists. Readers go through this initial procedure so they can listen to music above all else and enjoy the convenience of a music server. A short forty-five hundred words earlier I suggested the ultimate in convenience, iTunes ripping, only lead to major inconvenience, lost music, and hours of precious time wasted. I now suggest the ultimate in convenience is The Computer Audiophile CD Ripping Strategy and Methodology and it leads to increased enjoyment of one's music collection for years to come. A little hard work up front makes for very little effort down the road and saves one from major inconveniences like re-ripping two-thousand discs or investing time and money in obsolescence. The ability to recover from user mistakes and certain hardware failures with a couple mouse clicks is wonderful. Perhaps the biggest benefit of this strategy and methodology is the piece of mind knowing that one's music collection ripped while maintaining flexibility for future interoperability without sacrificing sound quality or usability.
Footnotes
[1] Wikipedia - http://en.wikipedia.org/wiki/Digital_preservation
[2] Wikipedia - http://en.wikipedia.org/wiki/Digital_preservation#Digital_sustainability
[3] Manual of Analogue Sound Restoration Techniques by Peter Copeland. Published September 2008 by The British Library 96 Euston Road, London NW1 2DB Copyright 2008, The British Library Board http://www.bl.uk
[4] Oxford Dictionary - http://www.askoxford.com/concise_oed/interpolate?view=uk


Recommended Comments
Create an account or sign in to comment
You need to be a member in order to leave a comment
Create an account
Sign up for a new account in our community. It's easy!
Register a new accountSign in
Already have an account? Sign in here.
Sign In Now