Jump to content
IGNORED

AudioLinux and NUC Troubleshooting and Tuning


rickca
Message added by austinpop

Summary of useful findings and recommendations


This section will be a living repository of useful info from this thread. It's very similar to a wiki and will be maintained by a small group of thread moderators.


Before you get started please refer to the Audio-Linux website to ensure you have the latest info and the proper versions of the OS. Audio-Linux.com  


**** Updated for AL 1.30 menu 118 or later.


  "First Run" setup for headless.  


Setup your NUC with a keyboard, mouse, and monitor to the NUC BIOS settings.  From the menu note the IP address of the machine to SSH into.  From a MAC the macOS terminal program supports SSH:

324537708_ScreenShot2019-01-28at3_02_19PM.thumb.png.739dc7f9cdb05e04da806c7c66877332.png


Then it is simpler to cut and paste into the terminal session. After entering the password for the audiolinuxuser you will be presented with the AL headless menu:


1518375894_ScreenShot2019-01-28at3_04_18PM.thumb.png.a7b2867a163f8f014e56e52ff69f94b4.png


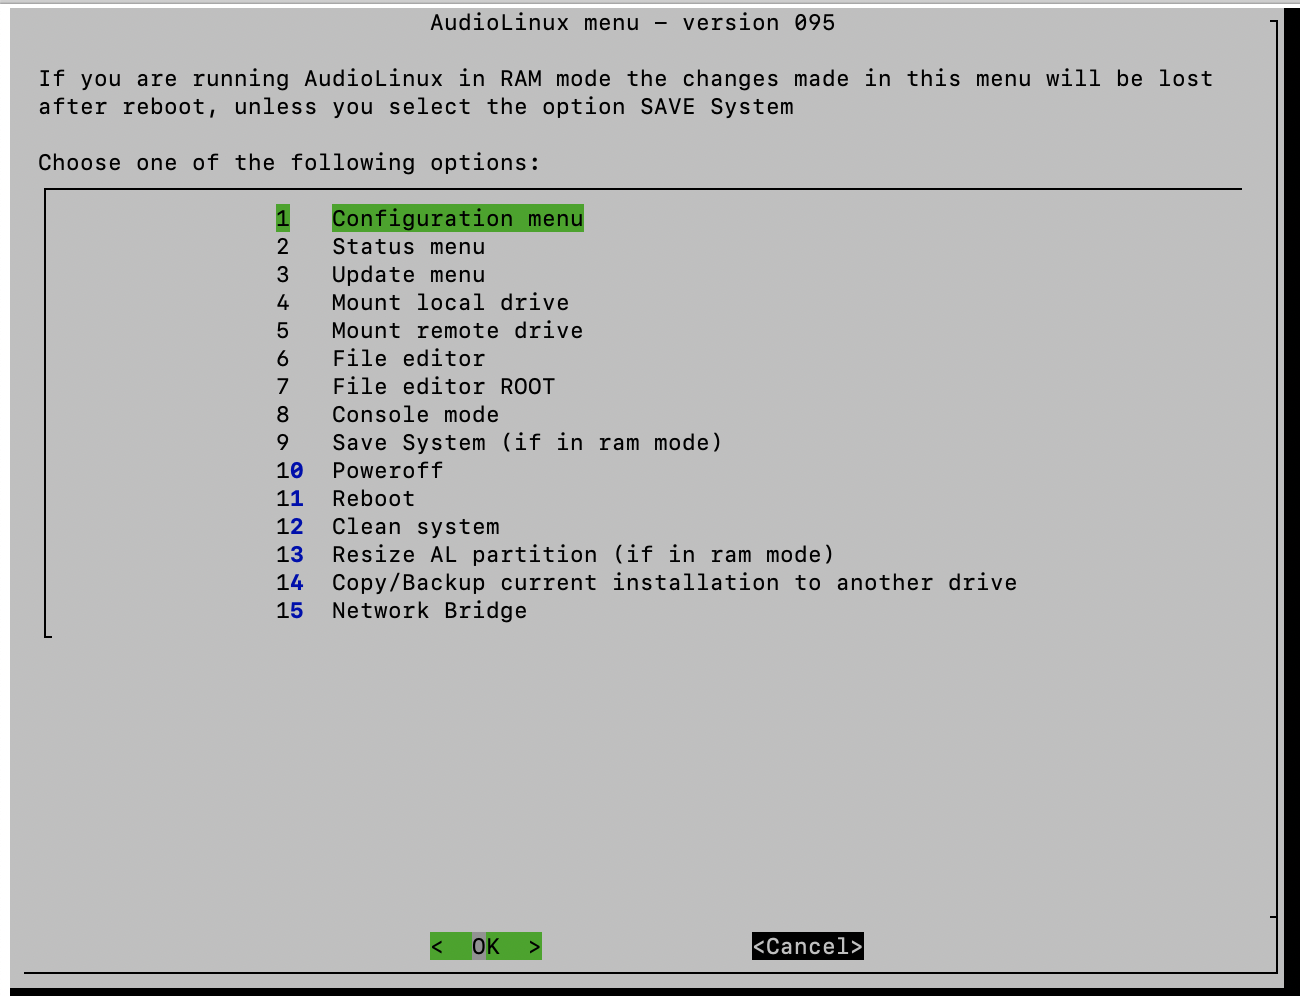
Option 8 takes you to the command line for the following basic setup.  You will need to be the Root user for this setup and the su command first:


su


Fix the time zone:  (this is my timezone - look in directory /usr/share/zoneinfo)


timedatectl set-timezone America/Chicago
 

Setup and Start NTP daemon (to keep the system time in sync)


*** the config file is now properly filled in.


Now Start the daemon


timedatectl set-ntp true


NOTE: Sometimes the system takes a little while to get synced up.
 

Set hostname  (this provides a unique name for the machine on your network.  Replace <NAME> with your chosen name)


hostnamectl set-hostname <NAME> 
 

Once the above items are set up your machine is ready to be configured for say a Roon bridge/endpoint. That is done using the AL menu.  To return to the menu do the following commands.


exit

menu


----------------------------------


For most of us, the following basic settings are key.

From the configuration menu:

6. START and enable Roonbridge

15. SET Realtime Priority to extreme

16. ENABLE ramroot (reboot after)


Return to the main menu and reboot the NUC using 


11 Reboot


------------------

Roon Server setup is a bit more complex and we will cover it completely a bit later.  The key is where you are booting from and where the Roon database is stored.  In general; say a 32gb OPTANE "SSD".


  • You have to partition the SSD into a boot drive and a storage drive.  
  • The transfer the USB stick install to the boot partition.  
  • Reboot from the boot partition.  
  • Do the basic setup. Timezone and name
  • Transfer the Roon Database to the storage drive
  • Start the Roon Server
  • .....


----------------- 

The machine will reboot and from the display attached to the NUC you can watch it boot up and load into RAM.  Once the AudioLinux menu is showing the endpoint should be available in Roon.    This completes the basic startup sequence.  The system is ready to start testing.    


Recommended Posts

1 hour ago, davide256 said:

1) does it matter which USB port is used for boot?

2) does it matter which port is used for asynch USB connection?

I'd use the rear ports for output (not sure if the front ports are connected via cables).

I would disconnect the fan, If no luck check if there's a low power setting in bios.

Link to comment
2 hours ago, BigAlMc said:

Bump

You can just leave it as NTFS with all your music pre loaded.

@greenleo made a guide no.4? To automount the drive so look at that first.

You will need to edit the etc/fstab file.

In lxqt you would use the root file editor (the pink one) in headless then it's nano.

There are many YouTube videos on basic nano use.

An easier way is to load lxqt desktop and then place your headless USB stick in the same machine. Then you can edit files from the headless USB. In a desktop environment.

However the file path will be different; run/media/audiolinux/audiolinux_mini/etc/fstab (same principle for other files)

Otherwise you will be editing the lxqt files.

For file transfers install WinSCP on your Windows machine and you can access your hard disc remotely which will now be located at /media/windows.

Lastly install Putty for console access which you can also open in WinSCP.

Link to comment
4 minutes ago, mourip said:

I like lmitche's idea of creating a document with all of your previous configuration changes listed so that you can quickly run through them...again.

and again.......and again.......and again...... etc.....etc.... thats why I'm stil on 0.3

In any event if you hear a difference between 0.3 and 0.6 its down to expectation bias ??

Link to comment
30 minutes ago, afrancois said:

I'm running 0.5 on a stock unit NUC7i7DNHE in RAM using extreme mode.  72 C° seems quite high.


That's probably the Tcase max temperature for a mobile CPU meaning once 72 C is reached the processor wil throttle ( reduce frequency) so that it doesn't go up any further. This will degrade the performance so ideally put it in a AKASA case to get it down to 42 C.

Clocks should be on all the time for best performance, it lessens the overall Crystals lifetime but we are talking 5 years +.

Link to comment
1 hour ago, davide256 said:

have both SPS500 and LPS 1.2. The SPS500 is a beast for quality current but it can't compete with LPS 1.2 device resolution when powering sensitive source electronics.

I have the sPS500 and lps1 both sound bright (I can't speak for the LPS 1.2) when compared to my Sean Jacobs 12v rail where I hear a much more natural, warm, spacious presentation.(in my particular set up) Your speakers remind me a bit of my audeze headphones, very sensitive to Hf distortion. Using a ISO Regen may fix that another option to explore is a different power supply.

Link to comment
1 hour ago, davide256 said:

Good power supplies behave much like the glass used for a telescope lens... the better the glass, the higher the performance that can be gotten out of the end product.

They also have a sonic signature, ultracapacitors don't sound the same as a toroid or  an smps, you will find in any review that an lps 1.2 has a brighter signature than the JS2 from the same manufacturer. They will also lose some of that clarity if they are struggling to provide the current required. The older HDPlex is not as transparent. A mundorf capacitor in a DC3 will impart a different sonic signature to a Nichicon or Elna in the sPS. With your speakers/ system  ( particularly your comments regarding the brightness of the NUC ) a Paul Hynes SR4, Sean Jacobs DC3 or uptone JS2 'may' be a better sonic match. To clarify I'm not stating that any of the power supplies mentioned are 'bright' it's about system synergy, the NUCPJYH is not at all bright here.

Link to comment
1 hour ago, BigAlMc said:

Can someone help me configure the parted and mount commands needed here please?

you need to mount the data disc in the media directory eg. /media/windows ( doesn't have to be labelled windows)

you just need to edit the fstab with nano no need for all the mount commands then save and reboot.

add this line to the fstab:

UUID=xxxxxxxxxxxxxxx /media/windows ntfs-3g nofail,noatime,uid=audiolinux,gid=users 0 0

substitute the x's with your drives UUID

use the command: lsblk -f

Link to comment
18 minutes ago, austinpop said:

His screenshot showed the disk is unformatted.


OK I assumed it was already ntfs.

I already had a formatted drive taken out of a windows machine with all my files on it. Easiest way is to plug it into a windows machine and format.

Parted is the only way I know  in command line, an alternative is to load lxqt and use gparted in a desktop environment there are simple sliders to resize the partitions.

for ext4 the fstab will differ:

UUID=xxxxxxxx /media/linux1 ext4 nofail,noatime,rw 0 2

Link to comment
4 minutes ago, Peter_T said:

The easiest program I found to make USB-stick images or clone USB-sticks is the free "ImageUSB" :

https://www.osforensics.com/tools/write-usb-images.htm

With all these program they should recognise a DD image and burn it automatically. Sometimes (rarely) it does not happen also in etcher.

If that happens then try Rufus 2.18, which allows you to select the image type.

Link to comment

Create an account or sign in to comment

You need to be a member in order to leave a comment

Create an account

Sign up for a new account in our community. It's easy!

Register a new account

Sign in

Already have an account? Sign in here.

Sign In Now


×
×
  • Create New...