Jump to content
  • The Computer Audiophile
    The Computer Audiophile

    Geek Speak: Raspberry Pi HiFi Is Here

    thumb.png

    Over the years I've researched countless software and hardware combinations, based on the Raspberry Pi, for use in HiFi audio systems. I'm not alone. Audiophiles all over the world have been trying to squeeze every ounce of audio quality from the device since its release in February 2012. During the early attempts it was "nerd city" with massive tweaking and lackluster results. Now, with the Raspberry Pi 2 Model B, the right software, and a few optional add-ons, audiophiles have a simple solution for HiFi sound starting at around $50.


    After publishing the previous CA Geek Speak article with instructions for using a Beaglebone Black as a UPnP renderer, I noticed many user comments seeking additional features. Members of the CA Community asked for WiFi, Spotify, and different audio output options among other things. Satisfying these needs wasn't possible with the hardware limitations of the Beaglebone Black. Thus, I went back to the Raspberry Pi platform and pieced together three different solutions for bit perfect playback.[PRBREAK][/PRBREAK]


    1) Raspberry Pi board with high quality digital audio output via coaxial RCA or optical TosLink.

    2) Raspberry Pi board with high quality analog audio output via RCA.

    3) Raspberry Pi board with high quality USB audio output or HDMI output


    All three devices can support gapless wired or wireless audio playback up through 24 bit / 192 kHz. The USB output can support higher sample rates including DSD. The HDMI output currently passes all audio out at 48 kHz. I believe a software fix is in the works for this HDMI limitation.


    The software used for all three devices is called Volumio. Volumio offers terrific features and a nice user interface. Here are some features:


    Supports accessing music stored on a NAS or USB drive

    Supports UPnP / DLNA / openHome as a media renderer

    Supports Spotify with a Premium Account

    Supports HiFiBerry audio hardware add-ons such as the DAC+ and Digi+ without manual file edits

    Supports USB audio output without pops, ticks, and other issues commonly found with the Raspberry Pi

    Supports AirPlay as an audio receiver

    Supports the Wi-Pi 802.11n (2.4 GHz) wireless adapter


    Requirements


    Device 1 - Digital audio output via coaxial RCA or optical TosLink


    Raspberry Pi 2 Model B $35.00

    Power Supply (5v 2a) $7.75

    microSD Card $8.91

    HiFiBerry Digi+ w/ output transformer $37.50

    Volumio Software $0

    Wi-Pi USB Wireless Card $9.69 (optional)

    USB microSD Card Reader $5.95 (optional)

    Win32 Disk Image $0 (Windows users only)


    Device-1.png


    Device 2 - Analog audio output via RCA


    Raspberry Pi 2 Model B $35.00

    Power Supply (5v 2a) $7.75

    microSD Card $8.91

    HiFiBerry DAC+ $32

    Volumio Software $0

    Wi-Pi USB Wireless Card $9.69 (optional)

    USB microSD Card Reader $5.95 (optional)

    Win32 Disk Image $0 (Windows users only)


    Device-2.png


    Device 3 - USB or HDMI output


    Raspberry Pi 2 Model B $35.00

    Power Supply (5v 2a) $7.75

    microSD Card $8.91

    Volumio Software $0

    Wi-Pi USB Wireless Card $9.69 (optional)

    USB microSD Card Reader $5.95 (optional)

    Win32 Disk Image $0 (Windows users only)


    Device-3.png


    Step-By-Step Instructions


    Almost all the instructions are identical for all three devices. Here are the instructions that are the same for all devices, followed by specific instructions for each device as needed.


    Step-By-Step Mac OS X (All Devices)


    - Connect the MicroSD card to the computer

    - Open Disk Utility (Applications > Utilities > Disk Utility), select select all volumes under the MicroSD card, then select Unmount. In my example the volume is named 8GB. (Image Link
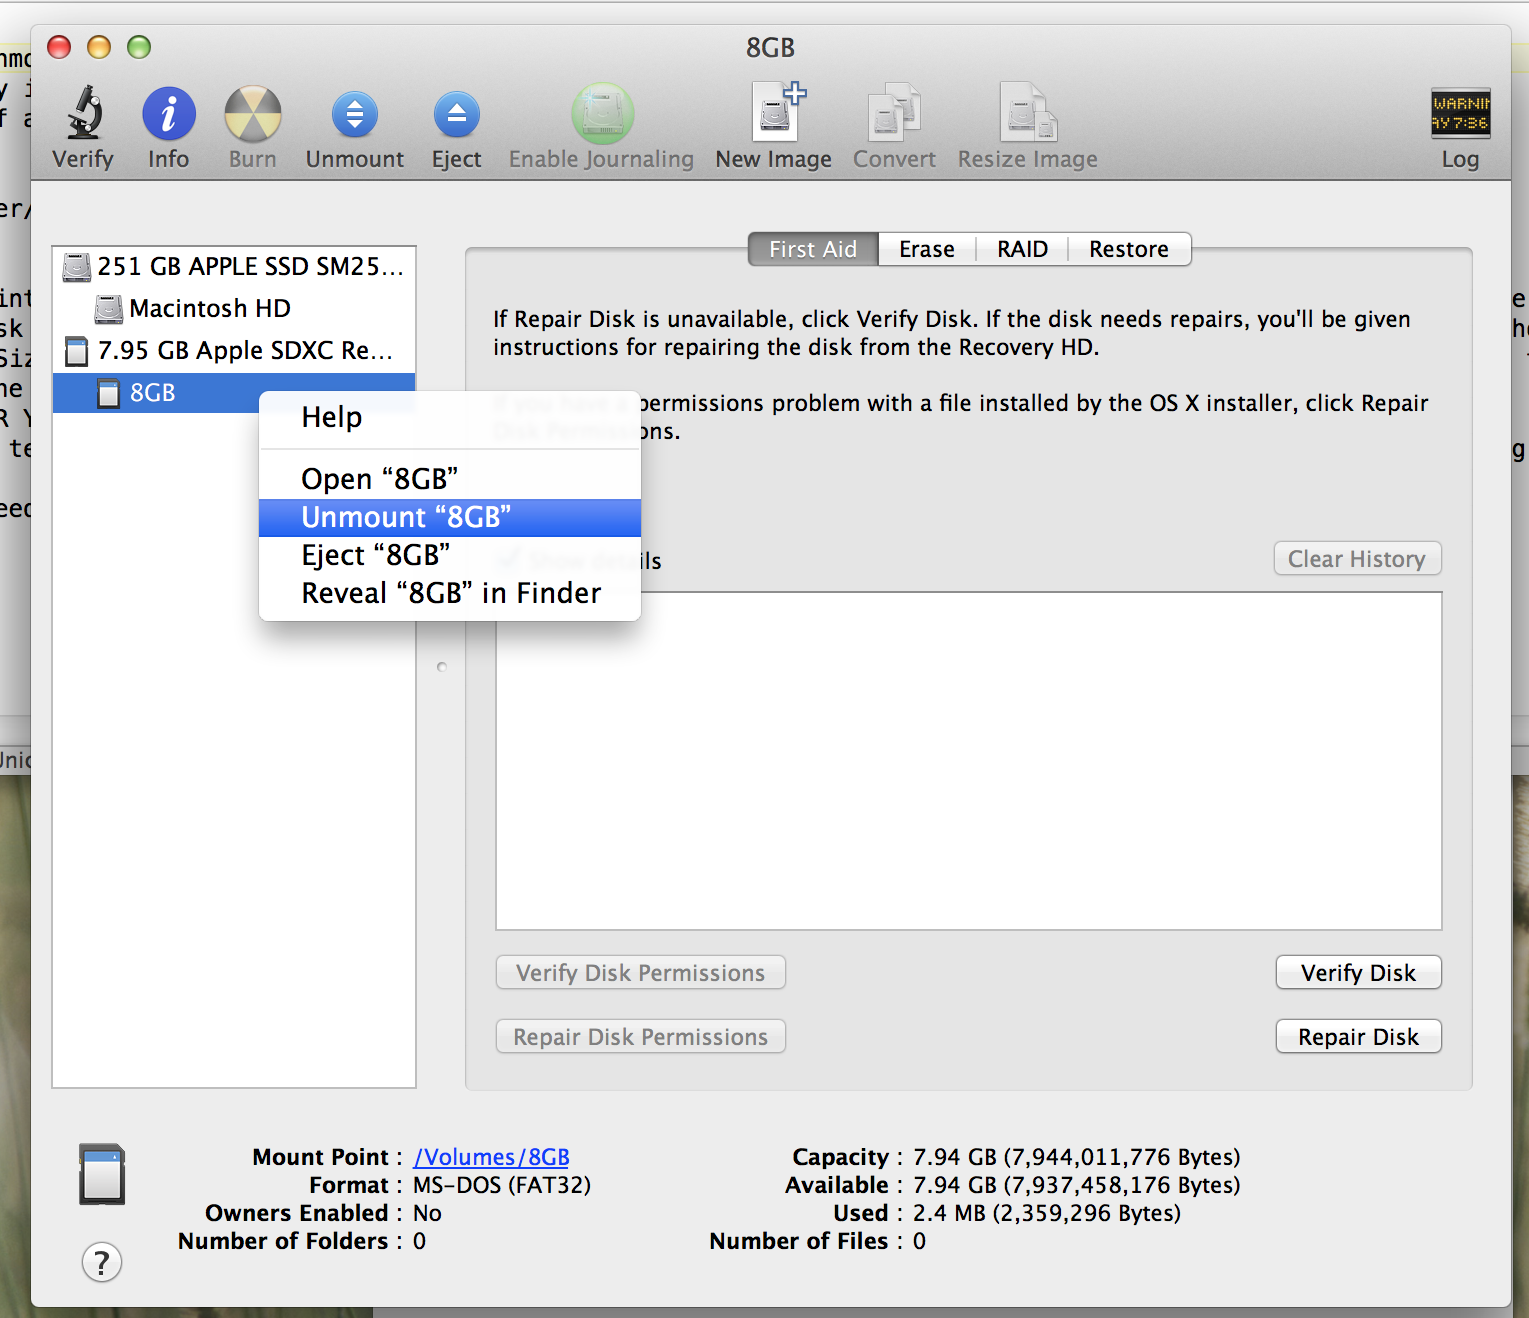
 ex.png)

    - Download the image file from Volumio (HERE ex.png).

    - Double-click the downloaded preconfigured image file named Volumio1.55PI.img.zip. This will automatically extract the image file named Volumio1.55PI.img

    - Open the Terminal app (Applications > Utilities > Terminal)

    - Type -> sudo su (without the arrow ->)

    - Enter your password if asked.

    - Type -> diskutil list

    - Take note of the disk number of the MicroSD card connected to your computer. My MicroSD card is listed as /dev/disk1. The MicroSD card should be easily identifiable by its small size. My MicroSD card is listed as 7.9 GB (Image Link
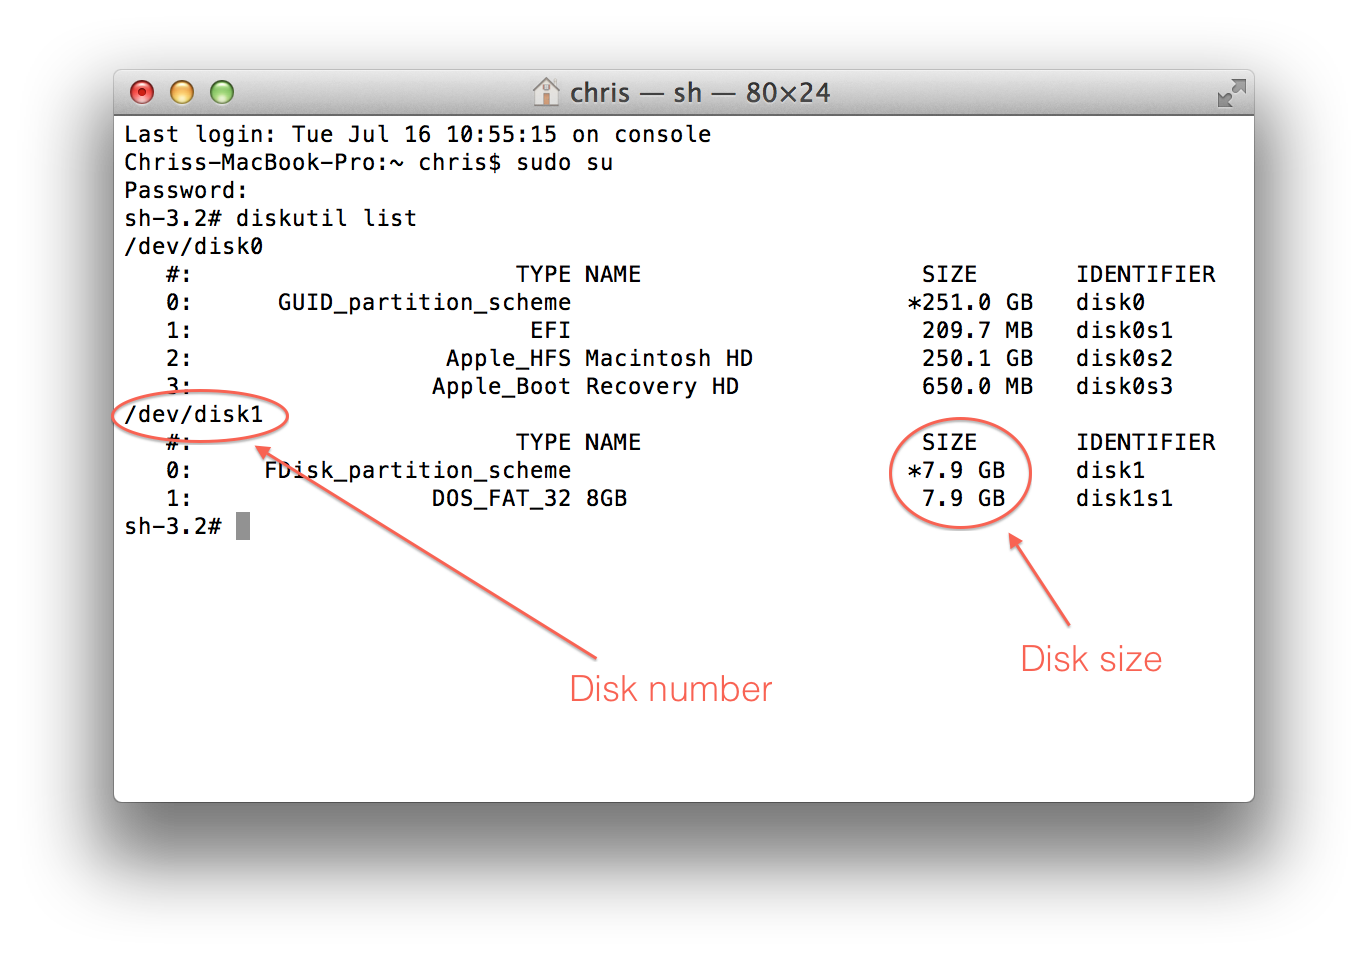
 ex.png)

    - Type -> sudo dd if=

    - Drag the Volumio image file named Volumio1.55PI.img on to the Terminal window to automatically fill in the path to the file. You can also type this in manually if desired.

    - After dropping the image file on to the Terminal window the command line should read something like this >> sudo dd if=/Users/chris/Desktop/Volumio1.55PI.img.

    - Make sure there is a single space after the path to the Volumio image file named Volumio1.55PI.img entered in the previous steps.

    - Type -> of=

    - Then enter the disk number of your MicroSD card. In my case this is /dev/disk1

    - The text should look something like this of=/dev/disk1.

    - Make sure there is a single space after the path to your MicroSD card entered in the previous steps.

    - Type -> bs=1m

    - The entire line should now look something like this >> dd if=/Users/chris/Desktop/Volumio1.55PI.img of=/dev/disk1 bs=1m

    - Hit Enter on your keyboard and wait for the image to be written to the MicroSD card. This will take several minutes and appear like your computer is stuck. Please wait for the command to finish.

    - Once the image has been written to the MicroSD card the Terminal window will list something like this.

    3781+1 records in

    3781+1 records out

    3965190144 bytes transferred in 2489.137016 secs

    - If you receive an error message stating "Resource busy" (Image Link ex.png
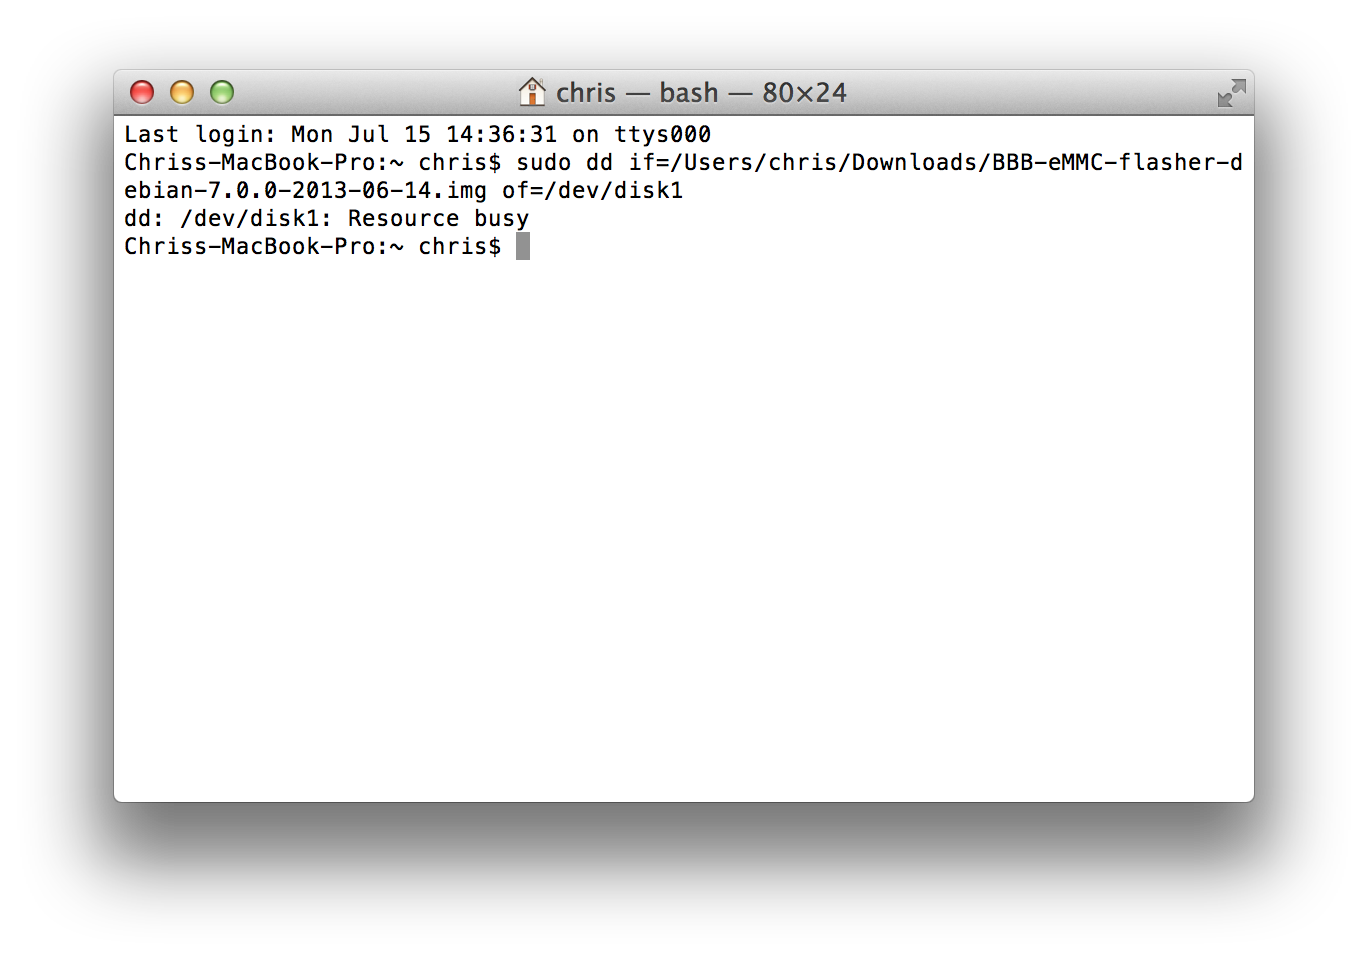
) you likely skipped step 2. Please unmount the volume and try again.

    - Open Disk Utility (Applications > Utilities > Disk Utility), select the MicroSd card, click Eject or Eject Disk via the right-click menu.

    - Place the MicroSD card into the Raspberry Pi's MicroSD card slot.

    - Connect an Ethernet cable to the board or put the Wi-Pi USB wireless card into a USB port, and your USB DAC to a USB port and connect the power supply.

    - The Raspberry Pi will boot up into the Volumio operating system and will be ready for the final configuration for optimal audio output.

    - Wait a few minutes for the Raspberry Pi to boot, then open a web browser such as Safari, Chrome, or Firefox and go to http://volumio.local . If the Volumio web page for your device doesn't appear, I recommend typing in the IP address of the raspberry Pi. To find the IP address I recommend using the LanScan application from the App Store Link ex.png. Please leave a comment below if you get stuck at this step.


    Step-By-Step Windows (All Devices)


    - Connect the MicroSD card to the computer

    - Install Win32 Disk Image Link ex.png

    - Download the image file from Volumio (HERE ex.png).

    - Right-click the downloaded Volumio image file named Volumio1.55PI.img.zip. Select Extract All (you may have to click Next after this). This will extract the image file named Volumio1.55PI.img into a folder with the same name Volumio1.55PI.img.

    - Open Win32 Disk Imager

    - Make sure the MicroSD card drive letter is selected under Device (Image Link ex.png)

    - Select the small folder to the left of the Device drive letter and browse to the file previously extracted named Volumio1.55PI.img. Don't select the .zip compressed file.

    - Click the Write button and Yes to any popup questions.

    - Eject the MicroSd card when Win32 Disk Imager finishes writing the image.

    - Place the MicroSD card into the Raspberry Pi's MicroSD card slot.

    - Connect an Ethernet cable to the board or put the Wi-Pi USB wireless card into a USB port, and your USB DAC to a USB port and connect the power supply.

    - The Raspberry Pi will boot up into the Volumio operating system and will be ready for the final configuration for optimal audio output.

    - Wait a few minutes for the Raspberry Pi to boot, then open a web browser such as Internet Explorer, Spartan, Chrome, or Firefox and go to http://volumio.local . If the Volumio web page for your device doesn't appear, I recommend typing in the IP address of the raspberry Pi. To find the IP address I recommend using the Advanced IP Scanner application Link ex.png. Please leave a comment below if you get stuck at this step.


    Device 1 Configuration - Digital audio output via coaxial RCA or optical TosLink


    - Open the Volumio web interface in your web browser

    - Select Menu in the upper right, then select System

    - On the System page you can enter a unique name for the device is desired.

    - On this page you can also enable AirPlay and Spotify

    - Scroll down to the section labeled I2S Driver, click the down arrow, select Hifiberry Digi, then click Apply

    - Reboot the device by Menu > Turn Off > Reboot

    - Reopen the Volumio web interface, select Menu > Playback

    - On this page you can set different volume options, DSD options, and resampling options.

    - Under the section labeled Audio Output click the down arrow and select sndrpihifiberry, then click Save Changes

    - By default the Raspberry Pi will now be capable of accepting audio as a UPnP / DLNA / openHome renderer and sending audio out the digital audio output via coaxial RCA or optical TosLink


    Optional Steps


    - For wireless configuration select Menu > Network, scroll down to Wireless Connection. Please note that the network name must be broadcast (Can't be a hidden network SSID). Enter the pertinent details and reboot.


    - Adding a USB disk or NAS drive is done by selecting Menu > Library


    Device 2 Configuration - Analog audio output via RCA


    - Open the Volumio web interface in your web browser

    - Select Menu in the upper right, then select System

    - On the System page you can enter a unique name for the device is desired.

    - On this page you can also enable AirPlay and Spotify

    - Scroll down to the section labeled I2S Driver, click the down arrow, select Hifiberry +, then click Apply

    - Reboot the device by Menu > Turn Off > Reboot

    - Reopen the Volumio web interface, select Menu > Playback

    - On this page you can set different volume options, DSD options, and resampling options.

    - Under the section labeled Audio Output click the down arrow and select sndrpihifiberry, then click Save Changes

    - By default the Raspberry Pi will now be capable of accepting audio as a UPnP / DLNA / openHome renderer and sending audio out the analog audio output via RCA


    Optional Steps


    - For wireless configuration select Menu > Network, scroll down to Wireless Connection. Please note that the network name must be broadcast (Can't be a hidden network SSID). Enter the pertinent details and reboot.


    - Adding a USB disk or NAS drive is done by selecting Menu > Library


    Device 3 Configuration - USB or HDMI output


    - Open the Volumio web interface in your web browser

    - Select Menu in the upper right, then select System

    - On the System page you can enter a unique name for the device is desired.

    - On this page you can also enable AirPlay and Spotify

    - Select Menu > Playback

    - On this page you can set different volume options, DSD options, and resampling options.

    - Under the section labeled Audio Output click the down arrow and select your USB DAC or ALSA, then click Save Changes

    - By default the Raspberry Pi will now be capable of accepting audio as a UPnP / DLNA / openHome renderer and sending audio out the USB or HDMI output


    Optional Steps


    - For wireless configuration select Menu > Network, scroll down to Wireless Connection. Please note that the network name must be broadcast (Can't be a hidden network SSID). Enter the pertinent details and reboot.


    - Adding a USB disk or NAS drive is done by selecting Menu > Library


    Wrap-up


    The Volumio web interface is great for browsing the options and trying different configurations without the requirement of Linux knowledge. I encourage everyone to snoop around and try items such as the Sound Quality Tweaks listed on the System menu. As usual please let me know if there are any errors in the above instructions and leave comments, questions, or concerns below.


    1-Pixel.png


    User Feedback

    Recommended Comments


    I have used Device Configuration 2 with output into my Twisted Pear Opus DAC very successfully. PiCorePlayer and MoOde (same family as Volumio, so to speak) both work very well. I'm eager to hear how folks using Configuration 3 find the USB output works sending DSD, and if that combination will handle 128 FS.


    Skip

    Share this comment


    Link to comment
    Share on other sites

    Many thanks for the information, I'm going to build one in the UK and see how it works, looks like an interesting project to build and compare to my Mac Mini and Aries.


    Quick question is a special case required for the add on boards?

    Within the UK i'm looking at this case??

    FLIRC Raspberry Pi Case | The Pi Hut


    Many Thanks Phil

    Yes, a special case is needed if you use an add-on board.

    Share this comment


    Link to comment
    Share on other sites

    Chris -- looks like fun to try and I've ordered up five of these for the house (so much for the Beagleboards I just implemented two weeks ago). The Pi2 board is on backorder from your and most suppliers, but only for about 2 weeks. Your supplier has a lot of case choices that are very inexpensive.


    Questions: can this work to integrate streaming of TIDAL as well? I assume that because these are streamers, they should show up as additional zones in JRiver and thus are controlled by the JRemote app? Thanks. JCR

    Hi JCR - No Tidal support yet. Yes, they will appear as additional zones in JRMC.

    Share this comment


    Link to comment
    Share on other sites

    Chris -

    I spoke to you Sunday morning at AXPONA about my project using a compute stick:

    http://www.amazon.com/Vensmile-TM-iPC002-Quad-core-Bluetooth/dp/B00REGG6QU/ref=cm_cd_ql_qh_dp_t

    and would like to get your opinion on how it would compare with this Rasberry Pi build. So far I have had great success with the Vensmile running win 8.1 and Jriver/Jremote as well as JPLAYStreamer/Minimserver/Kazoo. I know it is more than twice as expensive, but still a viable alternative for those more familiar with Windows. PM if interested in trying it out (I am local)

    Share this comment


    Link to comment
    Share on other sites

    Hi Chris, this is great, thanks.

    Very important for folks like me who are less technical and for whom linux have a usability issue.

    I have heard about volumio before and it's great to see it's working well.


    Any one of these devices are good candidates for a NAA??

    Share this comment


    Link to comment
    Share on other sites

    I just built one two weeks ago. It is quite amazing that I have three different way of sending my music to it.

    1. Airplay

    2. Volumio web interface (music accessed from a samba mount on a NAS)

    3. Having my music residing on a NAS with Minim server pushed to it with this little gem: https://itunes.apple.com/gb/app/musiclife/id963139521?mt=8

    4. Musiclife(publisher is Arcam by the way) will let you play music from Minim on the device itself, and then you can airplay it again


    Incredible how many variation on the same theme. I use them all depending on the situation and they all work. My preferred are 1st and 3rd. I also enable last.fm scrobbling, but it is a bit more involved, anyway it works too.

    Share this comment


    Link to comment
    Share on other sites

    Isn't Airplay limited to 16/44.1?


    And thanks. This is another awesome application for Computer Audiophile. Exactly the type of info and project I come here for.

    Share this comment


    Link to comment
    Share on other sites

    Thanks for this. I'm loving the beagle bone but am intrigued by this. Is it safe to assume sound quality is comparable via usb?

    Two questions:

    -i've read that the rasberries have an issue with usb because the ethernet connection passes through the hub. Is that the case here?

    -Ramplay - does it work well?


    Thanks

    Share this comment


    Link to comment
    Share on other sites

    Chris,

    Thank you for doing this. Quick question: why Volumio and not Rune Audio? I haven't done either and was torn between them. Curious as to what helped you make your decision.

    Share this comment


    Link to comment
    Share on other sites

    Just a note for those who are considering purchasing multiple Raspberry Pis/DACs in order to create a synchronized multi-room system: neither Volumio nor JRiver offers good support for synchronization of multiple players. Though I have heard that it is possible to get multiple player synchronization working with Volumio if you are using an Android device to control your system. And JRiver appears to be looking into doing more development in the area of "zone" synchronization.


    Having wrestled with this for some time, the only option I've found that works is to use Slimserver (open source software) with PicorePlayer installed on the Raspberry Pis. I have 3 of them running right now, each with a HiFiBerry DAC, with an old Synology NAS running Slimserver (and storing all of my music files). I use the iPeng app for iOS to control everything. It's extremely simple to set up, it allows for perfect synchronization between all the Raspberry Pis, and it's very inexpensive. Streaming to these 3 Pis, the Synology never uses more than 15% CPU, you can dynamic link/unlink players, and volume can be info ally controlled (or manipulated for the entire group). For me, this is a

    Sonos killer (especially given that out can pair each Pi up with a small Class D amp, like a TPA3116).


    Sorry for going a bit off topic - I was (and still am) a big fan of Volumio, but for me the killer app for these tiny little audio renderers is muti-room audio and in my experience only Slimserver supports that well (at least at present).

    Share this comment


    Link to comment
    Share on other sites

    I'll second the NAA question. These would be a good candidate to run as an NAA for HQPlayer?

    Share this comment


    Link to comment
    Share on other sites

    Cheers again to Chris for another of his thoughtfully put together articles on this fun hobby!! Nice work Chris!


    Best Regards,


    Blu99Zoomer

    Share this comment


    Link to comment
    Share on other sites

    Any thoughts on how the hifiberry sounds compared to say a usb stick dac like audioquest / meridian?

    Share this comment


    Link to comment
    Share on other sites

    Hi JCR - No Tidal support yet. Yes, they will appear as additional zones in JRMC.


    With a little effort you can get Tidal working with the Raspberry Pi and Volumio. If you're using a NAS and install minimserver and bubbleupnp, you can use the Linn Kazoo app to access the Raspberry Pi and use your Tidal account.


    I'm currently using this setup to feed a Devialet from the Raspberry Pi. It sounds good, and I haven't put my Auraliti back into the system since I got it setup.

    Share this comment


    Link to comment
    Share on other sites

    Just a note for those who are considering purchasing multiple Raspberry Pis/DACs in order to create a synchronized multi-room system: neither Volumio nor JRiver offers good support for synchronization of multiple players. Though I have heard that it is possible to get multiple player synchronization working with Volumio if you are using an Android device to control your system. And JRiver appears to be looking into doing more development in the area of "zone" synchronization.


    Having wrestled with this for some time, the only option I've found that works is to use Slimserver (open source software) with PicorePlayer installed on the Raspberry Pis. I have 3 of them running right now, each with a HiFiBerry DAC, with an old Synology NAS running Slimserver (and storing all of my music files). I use the iPeng app for iOS to control everything. It's extremely simple to set up, it allows for perfect synchronization between all the Raspberry Pis, and it's very inexpensive. Streaming to these 3 Pis, the Synology never uses more than 15% CPU, you can dynamic link/unlink players, and volume can be info ally controlled (or manipulated for the entire group). For me, this is a

    Sonos killer (especially given that out can pair each Pi up with a small Class D amp, like a TPA3116).


    Sorry for going a bit off topic - I was (and still am) a big fan of Volumio, but for me the killer app for these tiny little audio renderers is muti-room audio and in my experience only Slimserver supports that well (at least at present).


    Thanks for going off-topic, I use Zones in JRiver as I have three Volumio installs in the house... Linking Zones works somewhat well but they always start running 10-100ms behind each other ... Not a problem depending on how far away you are but the dining room and kitchen are close so the delay gets grating ... Am going to try this out now, so thanks again!

    Share this comment


    Link to comment
    Share on other sites

    Chris -- looks like fun to try and I've ordered up five of these for the house (so much for the Beagleboards I just implemented two weeks ago). JCR


    JCR have you tried Volumio on your Beaglebones ?


    Or Chris how about you? Any comments?

    Share this comment


    Link to comment
    Share on other sites

    I have been using PiCoreplayer with an original Pi, and taking the i2s directly off the Pi- skipping usb. It is rock solid and sounds amazing for under $100.

    Just a note for those who are considering purchasing multiple Raspberry Pis/DACs in order to create a synchronized multi-room system: neither Volumio nor JRiver offers good support for synchronization of multiple players. Though I have heard that it is possible to get multiple player synchronization working with Volumio if you are using an Android device to control your system. And JRiver appears to be looking into doing more development in the area of "zone" synchronization.


    Having wrestled with this for some time, the only option I've found that works is to use Slimserver (open source software) with PicorePlayer installed on the Raspberry Pis. I have 3 of them running right now, each with a HiFiBerry DAC, with an old Synology NAS running Slimserver (and storing all of my music files). I use the iPeng app for iOS to control everything. It's extremely simple to set up, it allows for perfect synchronization between all the Raspberry Pis, and it's very inexpensive. Streaming to these 3 Pis, the Synology never uses more than 15% CPU, you can dynamic link/unlink players, and volume can be info ally controlled (or manipulated for the entire group). For me, this is a

    Sonos killer (especially given that out can pair each Pi up with a small Class D amp, like a TPA3116).


    Sorry for going a bit off topic - I was (and still am) a big fan of Volumio, but for me the killer app for these tiny little audio renderers is muti-room audio and in my experience only Slimserver supports that well (at least at present).

    Share this comment


    Link to comment
    Share on other sites

    Great article. I've been running Volumio on a Raspberry Pi B+ for several months now. The Pi is driving my HRT MusicStreamer II+ DAC, connected to a Bryston Preamp/Amp. Sound is amazing! Volumio also has a very vibrant and friendly user community. The quality of the software distro and UI is amazing.

    Share this comment


    Link to comment
    Share on other sites

    I'd like see board with an isolated USB output for a dedicated connection to a DAC.

    Share this comment


    Link to comment
    Share on other sites

    Hello, I am brand new to computer audio. What exactly is Raspberry pi?

    Share this comment


    Link to comment
    Share on other sites

    Since this is renderer only, I presume that Kazoo can be used as player to push Tidal through this device? Or do I have something wrong? This is what I'd like to do......

    Share this comment


    Link to comment
    Share on other sites

    Chris,


    Thanks so much for this intriguing build. I've been waiting for the folks over at J River to complete their Raspberry Pi Id devices, but the last time I checked they were still not ready to ship. Which leads me to my question: How would the device you designed work in a (currently) Windows-based JRMC environment? Also, do you (or anyone else in the community) have any idea whether I could mount a Linux-based version of JRMC on the Pi using J River's Id stick? As always, I truly appreciate the insight.


    Best regards,

    Tim

    Share this comment


    Link to comment
    Share on other sites

    Got mine on order already. Going with option 3 and will use my old Dragonfly DAC which isn't getting my love recently. Intrigued by the other options which I can always move to at some point if I want to but didn't see any cases available. There are lots of cases available for the plain Raspberry Pi but not for the Raspberry Pi with the add-on boards. Anyone know of any cases that will accommodate these?

    Share this comment


    Link to comment
    Share on other sites


    Guest
    This is now closed for further comments


×
×
  • Create New...