


Let’s start with the question everyone asks: “why would I want to soup up my Raspberry Pi?”
- Because you can!
- It’s great fun!
- A well modified Pi will do far more than a stock one without annoyingly slow GUIs, sluggish controls, and even SQ issues if you throw in DSP, resampling, a huge library, and high res.
- Any Pi is great value, but a hot Pi at no additional cost is the audio value of the century!
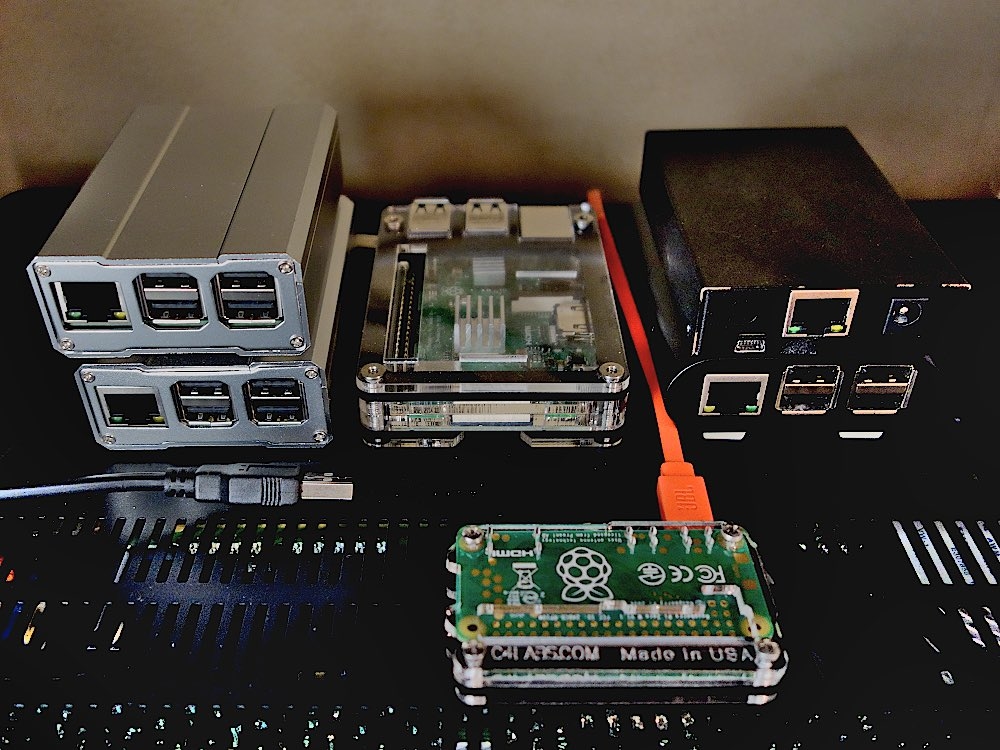
I run a “full” JRiver Media Center instance on each of 4 Pis – a stock 3B+, a souped up 3B+, a stock 4 gig 4, and a hot rod 4 gig 4. The GUI looks like the big box version, but it’s limited in functionality – and on a stock 3B+ it can be painfully slow. The 4 is excellent on basics and good at tough stuff. But an overclocked 4 in a good case with zram + other mods will do so much more & do it so much better.
Here’s a direct comparison to illustrate why you might want to consider pushing a Pi. Downloading JRiver took 23 seconds on a stock Pi 4 and 18 seconds after overclocking the CPU as far as can be done without violating the warranty (about 2.2 GHz, details further on) and putting it in a Flirc case. Installation took 19 seconds on the stock box and 9 on the hot box. Loading a 10,000 file library took 23:05 stock and 11 minutes rodded. Opening an artist page took 9 seconds stock and 3 modified. The CPU temp hit a sustained 71C on the stocker, but it never topped 40C on the rod. Using JRiver Media Center 26 on a stock 3B+ is infuriating because the GUI is slow, although the SQ is fine and it eventually does what you want it to do. OTOH, JRMC26 on the rodded Pi 4 is pure pleasure – the GUI’s fast and it never hangs on refresh or other library functions. It’s like using a big box.
There’s a lot more in the Pi for the audiophile than simple playback, if you’re so inclined and willing to put in some effort and take a little risk. The Value Proposition piece to follow this one is on projects you can do to make your Pi a serious audio workhorse, e.g. a very usable digital audio workstation on which you can record multiple track live music, edit, mixdown, master and export WAVs, FLACs etc. You can make a stereo 3 way active crossover on a Pi. You can even build a music server with onboard DSP and a two way electronic crossover - see HERE if you’re curious. It’s a difficult project that I haven’t yet tried, but I will! Want HT with MC? You can make a Netfix or Amazon Prime streamer Pi, running Kodi or OSMC. It works OK on a 3B+, but it’s outstanding on a killer 4! MC over HDMI is quite fine – just plug it into your HT receiver, HT system, or an MC DAC & the show’s on.
Rodding the Pi is a popular pastime and many have done it. Some tasks are easy, some are not. Some are hard enough to require experience, some are easy for a beginner. All have a risk of failure, but I haven’t killed a Raspberry Pi or a Beaglebone or ‘board in almost a decade of trying. The great thing about SBCs like this is that you’d have to seriously screw something up to prevent a rebirth simply by inserting a fresh operating system burned on a fresh card or drive.
That doesn’t mean that you won’t be the first to kill one – so be aware that you do all these things at your own risk and that of your device(s). If you let a Pi overheat, it might die now and it will surely die sooner than it should. If you plug the wrong things into the wrong ports, it might die. Use your head, be careful, and don’t do something if you’re not comfortable that you know what to do (or aren’t willing to spend another $40 or $50 to replace it). You’re not likely to brick it, but there’s no guarantee. For me, the risk is well worth it.
SBC BASICS
The single board computer has dramatically changed the way we listen to music. The best of them are capable of truly excellent sound quality right out of the box, with no more than simple assembly required. Stick the board into the case, use your “real” computer to burn an operating system image on a microSD card, slip the card into its slot, and boot up. Because they’re simple, inexpensive, and reliable, they reward the amenable audiophile with incredible flexibility, durability, scalability, and value.
 I’ve been listening to music with SBCs since I built my first Beaglebone Black music server about 7 years ago by following Chris’s excellent article. It was so good that I removed my seriously overbuilt white box PC music server from my listening room within days and never again used a big box for audio other than as a digital audio workstation (more about DAWs later, as I now run one on a hot rod Pi). My wife approved instantly, and even our critical son (a decent multi-instrumentalist) finally came around in a tale worth telling.
I’d already been ripping my CDs and any of my classic vinyl for which there were no digital files for a few years when the ‘bone came along. I started using Foobar2000 on XP in about 2005, and it was already a very good music management system by then. But our son, who has a truly fine ear, wouldn’t consider digital audio at all for the first decade of CDs. To be practical, he grudgingly got a CD player when he went away to college in 2000 and began to come around – but he remained adamant that my ripped digital files weren’t as good (even though he’d never heard them). One day I was ripping a few new CDs when he stopped by for a visit and began his usual harangue about how my ripped files couldn’t be as good as the best CDs. I was in the process of ripping, so I was set up to A-B in real time – I even manually aligned playback so we could switch inputs back and forth while hearing a given track with a fairly smooth switchover. I asked him which he was hearing…..and he guessed wrong. So I A-B’ed several tracks from multiple CDs for him. After a painful hour for both of us, he admitted that the ripped FLACs sounded better from the ‘bone through my early Emotiva DAC than his beloved CDs did from my high end player with its integral DAC. QED!
Since then, I’ve experimented with many little boxes, from cube computers to sticks to tiny form factor bare bones kit stuff. I even bought an original Celeron powered Asus Chromebox (not quite an SBC) when they came out, and it’s been a workhorse as a Linux box. Still stock except for a bigger SSD (OEM was only 16) and an extra 2 gigs of RAM (OEM was 2), it’s been running 24/7/365 for about 6 years except when it was on the bench being modified. I’ve run many operating systems on it, both in dual boot with ChromeOS and after wiping all traces of Chrome. Since I put Ubuntu 18.04 LTS on it, it’s been a production web server running ColdFusion and a MySQL database, run a wide array of music servers and players, and served as the heart of the home theater & MC audio system in our den. Even when I’ve frozen it or conjured up a few screens of death, it never bricked and always came back to life with a simple wipe and reload. It still lives happily next to my NUC (which is running Roon ROCK).

An audiophile can live very nicely with a stock tiny box, as long as the SoC and onboard infrastructure meet the system requirements for your intended purpose. Even “bone stock” Beaglebones and ‘boards work fine as basic music players, although Raspberry Pis and most of the other excellent SBCs I surveyed in the last installment of this series now offer much better performance at the same or lower cost. Although you really can’t overclock or otherwise rod any ‘bone very hard, the Black and higher ‘bone boards work fine in OEM form with MPD and similar players. I even have an xM running well, although they’re a lot more expensive than Pis et al with no advantages for audiophile use – they’re simply not great value for us.
BAKING THAT PI - OEM PERFORMANCE STATS & THE TEMPERATURE ISSUE
With the introduction of the 4 gig Model 4, the Raspberry Pi is a surprisingly powerful computer. A stock 4 gig Pi 4b completed the HardInfo Blowfish benchmarking task in 6.88 seconds, while a current Pi 3B+ required 40.9 seconds to do the same thing. To put it in perspective, an out-of-the-box 4 gig Pi4 performs like a well built Intel Core 2 PC.
Truth be told, the Pi 4 is no match for a current PC or Mac as a main computer. The most widely quoted Sysbench CPU score for the Pi 4 is 394 events /second, while an i3-8100T turned in 4210. But it will do almost anything reasonable that an audiophile needs it to do with skill and grace, with one exception – any Pi will get hot under the collar if pushed. If it gets too hot, a Pi will get sick and die. The Pi 4 runs significantly hotter than the 3b+, which can interfere with the kind of serious audio processing that a cool 4 can easily do but a 3 can not. It idles at about 60C in a “stock” plastic case and will rapidly pass 70C when called on to work hard – this is too hot for comfort (both the Pi’s comfort and that of its owner). Simple 2 channel playback is fine even with DSD512 files, although temps of 75+ are common when doing so without cooling of some kind. So even a stock Pi 4 really needs cooling to live a full life while performing as it should. As discussed in the previous installment of this series, cooling is easy with either a good passive case like a Flirc or an active fan cooled case. As all cooling cases are not created equal, you can view a nice online cooling case comparison here.

I use a passive Flirc case in our living room system because it’s attractive, it’s silent, and it contains a completely stock 4 gig Pi 4B only doing 2 channel playback on Roon Bridge or JRiver Media Center.
It ran at about 73C in a simple 3D printed case playing a DSD512 file. Here’s a typical temperature reading on it in its Flirc playing the same file:

A Raspberry Pi 4 will throttle its CPU speed when the temp breaks 80C. One this happens, performance degradation can be obvious depending on what you’re doing with it, and the life of Pi will be shortened if it’s run this way regularly. Interestingly, the Pi 4 CPU first drops to 1GHz when throttled, which is the maximum speed of a stock 3B+. But after 10 minutes of full load, it drops further to 600 Mhz, which is low enough to affect SQ on high resolution files. This is serious stress that will result in further performance problems and eventual device failure if you don’t do something.
If you’re pushing a Pi 4 hard enough to get full throttling, you really need good active cooling. And if that doesn’t keep the temp in the low 60s C, you need to review what you’re doing with it, if you’re doing it correctly, and whether a Pi is right for your needs. I have a 3B+ and an overclocked 4B (both fan cooled) set up as DAWs running Ardour, and the temp stays in the 60s on both even when I’m recording multiple tracks and monitoring from the same USB interface (which does cause some breakup even when recording at Redbook resolution). I’m preparing a separate article on recording and ripping with a Pi, in which I’ll provide a lot more information. It’s excellent for ripping CDs and vinyl with Audacity, and is also a great little recording studio if you make a few concessions like monitoring the input instead of passing the signal back through it for output monitoring. Just keep it cool!
Ambient temperature does affect CPU temperature, and one common cause of overheating despite active cooling is enclosing the Pi in a cabinet or other area with no air flow. If the Pi is working in an area with an ambient temp above 75F, it may not cool maximally even with an active case. So you need to either provide some air flow wherever it is or move it to a climate controlled room that’s below 75F.
Other SBCs similar in design and construction to the Raspberry Pi have the same problems, and the solutions are pretty much the same across the board (OK – pun intended). But the array of available cooling cases (like most other add-ons) for the Pi is much greater than for any other SBC I’ve seen, which is one of many reasons I prefer it to its competitors. But almost everything in this article applies to most SBCs. I use the Pi because I know it well, it’s widely available, widely supported, and it works.
Put a heat sink on each chip if they’re not integral to your chosen case. If there’s no room in your case, get another one in which you can use them. They come with many cooling cases and are available in sets or bulk for a few $ if they didn’t come with yours. A Pi 4 needs them on the CPU, the RAM chip, the LAN (ethernet) chip, and the USB chip. There’s some controversy over whether putting one on the WLAN (WiFi) chip is of any value. It’s hot to the touch, so I do it (no, the antenna is not in the chip). They’re cheap and easy to install – just follow the instructions. I haven’t compared aluminum to other materials because I still have many aluminum ones and they work just fine.

PERFORMANCE MODS BEYOND COOLING
The following is a description of what I’ve done, what I’ve learned, and how I manage my own devices. It doesn’t take much to brick a single board computer running at its absolute limits. Undertake any or all of the following entirely at your own risk, and be sure you know what you’re doing before you start a task or project. I’ve had my share of failures and recovered from them all. But you may not be so lucky – so get help if you need it and do not try to do things that are beyond your level of knowledge, skill and experience.
MEASURING AND MONITORING PERFORMANCE
As you start modifying your SBC for better performance, you’re going to want to see what you’ve accomplished. The Pi 4 makes it easy to monitor CPU performance by including taskbar widgets for CPU temp, utilization, and real time clock speed. All you have to do is right click the desktop taskbar (which they call a panel) and open Panel Preferences – Panel Applets to add all 3 CPU monitors to the taskbar. And below the screen shot of the 3 applet indicators in action is a great basic performance dashboard for my overclocked, zram’ed, actively cooled Pi 4 doin’ the full tilt boogie while recording live music. The temperature applets are there in real time & you can run cpustatus at any time.


I use sysbench as a basic performance evaluation tool for Linux systems. It’s a nice little package that tests CPU, memory use and I/O. You can install it easily by entering sudo apt install sysbench into a terminal window. The user manual (here) is helpful although it was apparently not updated fully following the adoption of sysbench as a module in Rasbian and other Linux packages. So there’s some extraneous material in it like instructions for compiling it, which you no longer have to do. Follow this link and this link for more information on using it. The readout is simple to understand – I find the mean time per request to be a very useful metric.
Here’s a typical screen showing the performance of one of my Pi 3B+s in a fan cooled case running the latest Buster image on a cheap 16 gig class 10 microSD card. You’ll see more of these readouts when we get to the effects of overclocking, zram and other performance mods with some potential to improve audio performance (but also some potential to degrade it – there are always tradeoffs).
To show you how valuable sysbench is, here are the per-event statistics for my stock Pi 4 in a passively cooled Flirc case. As can be seen, the 4 is about 25% faster in real world performance.


For those of you who want some objective measures of the value of your efforts and expenditures, there are many great tools to help you see what you’ve accomplished. I’m staying out of the objective-subjective debate, so I’ll leave it to you to decide if what you measure is having any effect on what you hear (or vice versa).
 I recently came across a really cool monitoring tool called Cockpit, which is a very comprehensive and useful monitor for all Linux systems. Accessed with your web browser from any device on your network, it displays an amazing number of parameters, and will both display them in real time and archive them for you. The main menu bar on the left is self-explanatory. There will be another icon for each monitored device. The lowest category icon (the little meter face) opens a dashboard that displays a tabbed functional summary of each networked Linux device on which Cockpit is installed. Run Cockpit and temperature monitor displays together and your Pi’s as wired as a cardiac ICU patient

Here is a screenshot of some basic data flow parameters from my dev Pi 4 while mixing down 5 WAV tracks into a 2 track stereo master. The working files are all on a USB drive connected to the Pi, which is why there’s not more network traffic. The black line marks playback initiation.
Hardinfo is another great performance monitoring package that’s in the Raspbian repository as well as those used by other popular Linux distros. FWIW, you can also download a free version for Windows from the main website or upgrade to a fuller feature set for $79 (not available in the open source Linux packages). Install it with apt and run it with the simple terminal entry “hardinfo”. You get a series of benchmark tests that rally wring out your little box. The tool runs 7 basic tests and displays the results in a fairly easy to read terminal window (there’s a nice GUI for Ubuntu, but I don’t see it for Raspbian).
Here’s a hardinfo run from a hot rod 3B+. Hardinfo results fill several screens on the terminal window, giving you each test’s result on your box at the top and benchmarks below. This is the Blowfish run, in which you can see that my little Pi completed the exercise in 9.14 seconds:

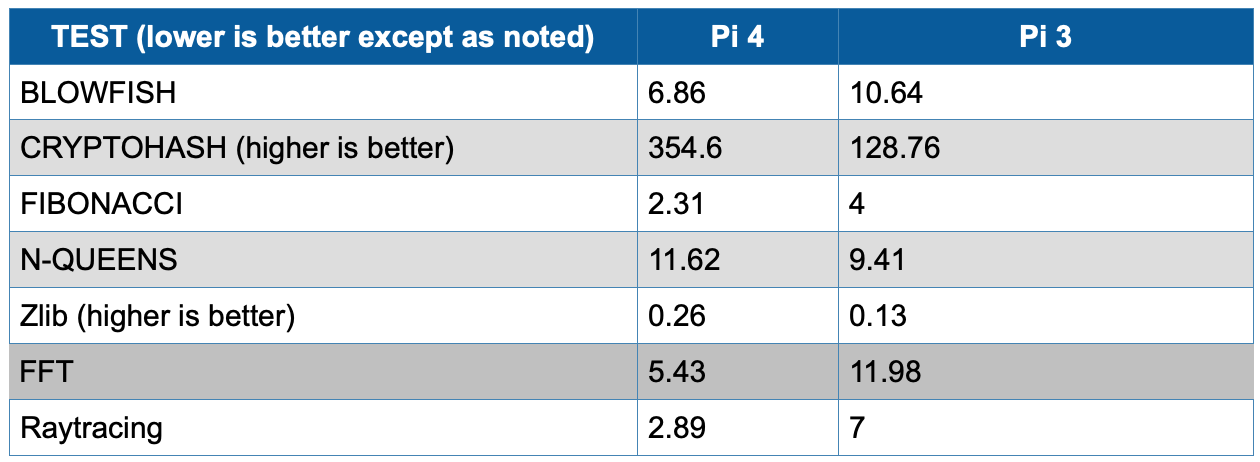
The Blowfish test is a measure of the encryption speed of predefined text blocks. The metric is seconds, so lower is better. One of the really cool things about hard info is that it provides benchmark data so you can compare your box to others. Notice that my hot rod Pi 3B+ (above) did the Blowfish test in 9.14 sec while a stock Pi 3B+ did it in 10.64 (below). So the mods described in this article really do work!
A head to head comparison of stock Pi 3B+ and 4 shows what you get with hardinfo and how valuable it is – the 4 is about 68% faster on average than the 3! Here’s the comparison:
THE LITTLE ENGINE THAT COULD – WHY A PI IS LIKE A RACE CAR & WHY IT MATTERS
I’ve been an amateur auto racer for decades (SCCA, VSCCA, SVRA). I’ve kept away from the fast classes for one simple reason: it takes regular, serious practice to safely race a car that hits 60 in 3 seconds and 150 at the end of every straight. I’ve done very well and had a great time in “small bore” with a 100 hp Lotus 7, a 95 hp LeGrand sports racer, a 110 hp Mini Cooper etc. But I’ve spent the most race time behind the wheel of a 60 hp Formula Vee, which may be why I love the Pi so much – it’s kind of like the Formula Vee of computers. For reference, the original FV rules required 1200 cc air cooled Beetle engines that were designed to make 35 hp. The rules allowed certain “improvements” like blueprinting (re-machining to exactly meet the performance limits of factory specs) but none of the usual hot rodding methods like enlarging bore, lengthening stroke, domed pistons, high lift cams etc. It was knowledge and precision that pulled an additional 70% of power from those little guys.
When you only have 60 hp pushing an 800 pound car/driver combo, everything affects performance. Half of one horsepower will affect your lap times if you’re driving at the car’s limits. A slightly dragging brake shoe will affect your lap times. Being ten pounds above your minimum class weight will affect your lap times. Using 0 weight synthetic oil instead of 5W-30 will give you some fraction of a horsepower. And I won’t even begin to discuss how many ways you can pick up 1/10 hp by bending the rules (which are very strict in classes like FV), which I only know because my friends told me.
Vee drivers remove anything and everything that might use power better fed to the drive wheels. Even the oil filtration system can affect engine output power. The engine is driving the oil pump, which has to push oil through many feet of tubing and channeling in the lines, galleys, and cooler. A tiny protrusion on the body’s surface can add enough air resistance to add a few hundredths of a second to a lap time. Is this important? I won my best race ever with a 1:06.195 lap at Lime Rock Park, which was the fastest time of the day in our entire race group and my fastest ever in that car (the 16th Lotus 7 series 1 made and a really cool little car). The guy who came in second ran a 1:06.198 – so 3 thousandths of a second mattered.
The same small margins and seemingly minor efforts affect performance of little computers like the Raspberry Pi. For me, the term SBC might just as well stand for “small bore computer” - a Pi is the computing equivalent of a race car with a small engine. The time it takes for the CPU to request data, get it back from storage, and push it out as an audio file is its lap time. Like a Formula Vee, it’s being pushed to its limits and running as hard and fast as it can - and the tiniest tweaks can up those limits enough to make a difference in both sound quality and functionality. If you’re pushing that Pi to play DSD while implementing signal processing of any other kind, it’s running on the ragged edge…..and the finish line is in sight!
LIGHTEN THE LOAD ON YOUR PI
The most reliable OS with which to start is Raspbian, which is the “official” operating system of the Raspberry Pi Foundation and a very well developed package. The current version is based on Debian 10 (aka Buster), which was released last July and has benefited from almost a year of refinement. The full Raspbian installation brings a lot of bloat that you’ll never need or use if your Pi is truly an audio-only machine. Uninstall everything you can identify that’s of no use to you, e.g. LibreOffice and Apache. You can see a list of all installed packages by running the command dpkg --get-selections in a terminal window. Of course, the better alternative is not to install that stuff at all. You can use a light distro like the basic Raspbian lite package. You can run a light operating system other than Raspbian (see my last installment in this series for a deeper dive into this, with recommendations). Or you can choose a player that comes packaged in a JEOS (“just enough operating system”), which is the cute term for the tiny (often <20 MB) dedicated operating systems that come with audio packages like Volumio,RuneAudio, and PiCorePlayer.
Not all JEOS instances that comes around dedicated players will allow ssh access and tweaking of the Pi beneath the crust. Even fewer let you use your Pi for other tasks, and almost all of those that do limit you to the terminal window for access and control. If all you want to do is listen to music with Volumio or a similar player, a stock Pi 4 will do the job very well (as will a few older versions).
Unless you’re going to need it (which is unlikely if your Pi is purely for audio), Javascript is dead weight – disable or remove it. Run the lightest browser you can find, if you need one at all. Chromium is my default, but Kweb is pretty cool and Dillo is about as basic as it gets. Vivaldi’s in the middle – it’s light and functional, but it’s nowhere near as primitive as Dillo. Eric is a light browser written in Python that looks good, although I haven’t tried it myself.
To go really light, you can also run headless. Drop graphics entirely, and SSH into the Pi for all interactions with the system. Many audio packages are controlled from a remote web browser, so you don’t really need a GUI on your Pi if you use one of them. JRiver’s ARM package requires a desktop of some kind, but there are workarounds for this on the web if you want to go to the trouble. VNC will work as a remote desktop for a headless Pi, but it takes a bit of work. I have it set up, but I never use it.
Reduce the memory allocated to the GPU to the minimum. Go into the advanced options in raspi-config and change the memory split. You won’t miss it unless you’re running a graphics-heavy package like a full instance of JRiver Media Center on your Pi, in which case you need to rod it to get the most out of it. If you have no display, you don’t need a lot of memory for graphics. Disable HDMI by entering the command line prompt /usr/bin/tvservice -o into a terminal window to reduce your power demand a little bit. Changing the 0 to a 1 will turn it back on. For some operating systems, you’ll need to use the command vcgencmd display_power 0 (and 1 for on). And sometimes the resolution is screwed up when you do it this way, in which case a reboot has always restored it for me.
One of the main benefits of keeping your software lean is obviously leaving more file system capacity. But there are others that impact audio use, such as background app refreshes and running processes you don’t want or use. Run the command ps aux in a terminal window to see what’s occupying your processor. I’m pretty lean, so there’s not much to see – but here’s the running process list on my latest hot rod.

Notice how little CPU and memory use I’m logging in this overclocked monster Pi. It’s actually the device I’m using as a DAW for my next installment in this series, which is on cool things an audiophile can do with a Raspberry Pi (like rip CDs and vinyl, record music, and make a 2 or 3 way electronic crossover).
You really don’t need to consider rodding your Pi unless you’ll be pushing it beyond basic audio use. But if you’re going to use heavy DSP on DSD, transcode video, etc or build more powerful audio tools on it, teaching your Pi to pump a little iron is a great idea.
ZRAM AND SWAP PARTITIONS
You can speed up your Pi and lighten its load by using ZRAM, a 3rd party package from Novaspirit Tech that lets your Pi use available RAM space as a kind of RAM disk with real time compression. Used as a swap partition, it offers some advantages that make it worth considering if you’re doing things on your Pi that need swap space (e.g. web browser or other graphic activity). It reduces storage accessions, so it prolongs device life. And it reduces I&O when swapping is active, so it can make some apps run faster. ZRAM is useful where RAM is limited, so it’s probably more helpful on Pi 4s with 1 or 2 gigs than with 4. It’s definitely worth trying on a 3B+ (only 1 gig of RAM) and it does speed up tasks like page loading on a 4. It also makes the JRiver Media Center GUI noticeably faster and more “PC-like”. Most graphic-laden web pages that took 5 to 10 seconds in stock configuration load in 2 or less with ZRAM active at 65% of available RAM, allocation of 256, and priority of 65.
Some audiophile activities, e.g. streaming audio from the web, may require increasing swap space. Spotify specifically recommends maximizing it on a Pi “for smooth running”, although that was written before the 4 gig Pi 4 was introduced, and I only used Spotify at my desk in the office. As I don’t use it at home, it’s been sleeping since I retired and I haven’t tested it against RAM or swap space.
ZRAM has been an installed package with Raspbian since 2019, so you don’t even have to download and install it. Just configure it in etc/default/zramswap – there are few parameters, and the choices are pretty clear. I haven’t experimented with radical changes from my current settings yet, but I suspect the benefits of more radical settings like 100% of available RAM and a priority of 100 would enhance some operations but hinder others. Here’s the basic setup screen:

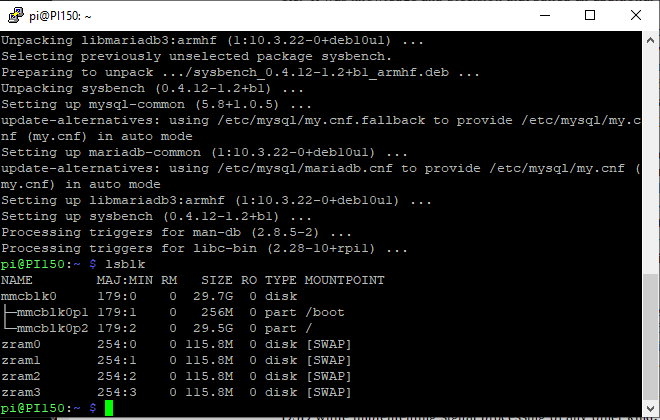
It’s instructive to compare the memory stats for a Pi 3B+ (“Pi150” below) running zram against a 4 gig Pi 4 (“raspberrypi”) without it, both with 32 gig SanDisk Ultra+ A1 (V10) cards.

Notice that the 1 gig Pi 3 has over 800k of its RAM available for swap thanks to zram/zswap, while the 4 only has 102k available for swap. Because zram also compresses the swapped data, it’s more efficient than the stock swap setup, and it’s much faster.
Here’s lsblk after configuring zram as above on a stock Pi 3B+. You can see that there are now 4 zram partitions available. You do not want to swap to the SD card. This performs far worse than zram and shortens the life of the SD card as discussed earlier.
Zram will obviously affect playback from memory, which many audiophiles believe results in better SQ. I do not hear a clear or consistent difference in JRiver Media Center 26 on my modified 4 gig Pi 4 with zram, and JRiver states clearly on Interact that they are “...unaware of any test that shows a sound quality advantage to memory playback”. FWIW, I also hear no clear difference in the latest JRMC instance on my Win10 PC. The only thing I may be hearing is that the weird reverb-like effect on Bonnie Raitt’s voice on her original 1972 Love Me Like a Man (from the album Give It Up) seems to be even weirder when played from memory. I have no idea what that effect may be – it’s not a normal delay. Obviously, both your mileage and your opinion may vary from mine and JRiver’s.
HARD DRIVE CHOICE, USE, MAINTENANCE & TWEAKING
The optimum setup for serious audio use of a Raspberry Pi 4 is an externally powered USB3 SSD for boot, OS, and audio database. Remember that you can boot from a USB device on a Pi 3B+ or a 4, and you don’t need an SD card in the slot once you set it all up. For me, NAS is the place to keep audio files. I run RAID 1 to minimize potential downtime from HDD failure, and I backup to a cloud service. You can do well with a USB3 HDD for your files, but make sure you have good off site backup to minimize the risk of having to say “Oh, no - I knew I shouldn’t have done that!” I’ve had the pleasure of losing about 500 photo files that were very important to me (and impossible to retake). I never again want that sinking feeling, and I won’t live long enough to rip all my CDs and selected vinyl again.
Drive read/write speeds affect computer performance, as do bad sectors, lots of extraneous data in the partition(s) from which you pull your files, and overheating. Using the best and fastest drive (HDD or SSD, as appropriate) in a good external USB housing will let you get the best performance from your SBC. Keep your external drives cool – the hotter they are, the slower they write and the sooner they die. Do not stick them in a closed cabinet. Make sure they’re in a location with good ventilation and well away from heat sources. Putting a hard drive near an HVAC register or even a lamp can increase its operating temperature enough to cause slowing and premature failure over time.
Use ventilation wisely and creatively to keep your components cool, including drives and other peripherals. Many computing devices have embedded temperature sensors – use them all to keep track of running temps. I built a floor to ceiling 19” rack into the shelving and cabinetry in my library / listening room in our house, but I couldn’t leave as much space behind it as I wanted to do without distorting the cabinetry. So I directed air from a Rotron Whisperfan to the components through a network of anesthesia tubing as ducts.
Use partitions to speed drive performance. For example, keeping your music and picture files in different partitions minimizes how often the drive head has to reposition itself. Consider partitioning by genre, format (e.g. FLAC, DSD, mp3 etc), or any other distinction you can make. The less that head has to move, the faster your files can be written and read. As drive head failures are one of the more common causes of disc death, this should also prolong drive life.
Periodic disk maintenance is essential. Clean out temporary files regularly, especially if you have any temp file storage on the same USB drive your Pi uses for music storage. Although defragging is needed much less often today than it was not that many years ago, a seriously fragmented drive will be slow. So I still check mechanical drives for fragmentation. Based on what’s known today, do not defrag a SSD. This advice may change if someone discovers that it’s a good thing in some way for some reason, but virtually every knowledgeable source today says to avoid it.
Now that Pis can boot from USB, you may well consider moving your entire root file system from an SD card to a USB drive and leaving the SD card out. This can speed up your Pi, especially if you run a robust OS and use an externally powered small SSD for boot and root plus an externally powered and well partitioned big HDD for file storage. You will not gain much (if anything) from this effort if you use USB2. There are 2 USB3 ports on a Pi 4 – use them and leave the 2s empty. If you must add other USB peripherals, use a powered USB2 hub.
SD CARDS
If you’re using an SD card, your choice of card can affect performance. And it’s not as simple as buying the one with the fastest specified read-write speeds. Used for boot, OS, and file system, no SD card will achieve its maximum rated speed in a Pi because the bus through which data travels back and forth to the SD card is puny, even in a 4. Many published tests have shown far greater speeds from the same cards in more serious computers. Remember that the speeds you see written on the cards and their packaging are for sustained one way transfer. They will never be reached in an environment with frequent or constant two way data flow – and if you’re using the SD card on your Pi for boot, OS, and even a minimal file system, it’s being read from and written to again and again. The relevant speed is the random access speed, and that’s a lot lower than the advertised speeds.
The 4 has about twice the maximum throughput speed of the 3B+ (measured with hdparm, a great little package to check your Pi’s SD access speeds). The 4 hits 44 MB/sec and the 3B+ does 22 with the same exact card. But especially if your OS and a file system are on the card, it’s critical to maximize the 4k random read & write speeds, which will shock you when you first see them. This tests how fast the computer can read or write random 4k blocks of data, whereas the max throughput speed measures how fast it can pump large data streams in or out.
In my Pi 4s, the best microSD cards are doing 4k random reads at 10-11 MB/sec and writes close to 4. For reference, the card on which the Pi Foundation supplies Noobs will hit 6 MBS on read and 1.5 on write (per this note). So there’s clearly benefit to be had from better cards, even though the maximum speed rating of the Pi bus to the SD card is about 23 MBS and it does about half that in real life. No sane audiophile would keep music files on the SD card, so sustained throughput is far less important than 4k random reads and writes for us – and the Pi 4 will move data onto and off of the SD card faster than the lower class cards can handle.
The newest rating for SD cards is the Application Performance Class (details here). This rating system is based on random reads and writes (measured in input-output operations per second, aka IOPS) plus minimum sustained sequential write speeds in MB/S. It’s apparently aimed at videographers, but it’s useful for audiophiles too because our files are similar in nature, size and use to theirs. You’ll also see V ratings from V6 to V90. These (explained here) are based more on sustained sequential write speeds. V30 (which is the same speed as U3) is a 30 MBS card, which is more than adequate for audiophile use in a Pi 4.
In my Pi 4, the Samsung Evo+ hits about 11 MBS on random reads and the Pro and Pro+ both reach 10.7-10.8 . But on random writes, the Evo+ hits 3.85 while the Pro+ only hit about 2.7 and the Pro was even slower at about 1.9 . So I’m running 32 gig Samsung Evo+ microSD cards in all my Pis for home audio. I tried cards with higher V ratings (the new rating system for video performance) and saw absolutely no change in any performance parameter, from boot to graphic displays to music rendition over V30.
I have not tried to store and stream audio from the SD card, so I can’t comment on that because it’s not something I’d recommend doing. You can get huge microSD cards now, and I’m using a 64 and a 128 in development machines. But I wouldn’t store media files on them. Both USB3 and network storage will be much faster, and you won’t be taxing other functions.
You should know that SD cards “wear out” – they have a lifetime that’s measured in P&E (program and erase) cycles, because the interface chips that move electrons into and out of the guts eventually fail. The industry standard quoted for this is 100,000 P&Es – but some of the best current cards can survive 10 times this amount. The other problems that take out microSD cards (apart from loss and obvious breakage) are things like corrosion or physical damage to the pins, embrittlement of the card itself from repeated flexing, and inserting or removing them with voltage on them. Buy good ones and be careful with them for maximum lifespan.
Apart from the obvious caveat to be careful with them and replace them every 3 to 5 years unless you can lose what’s on them without a problem, you can also get the most out of them by minimizing accession. So, for example, don’t put your swap partition on your Pi’s SD card. Leaving a Pi running 24/7 with any background activity that reads from or writes to the SD card will use up some of its P&Es. Clone each one once you’ve done all the tweaking you plan to do, so that you can pick up where you left off if a card fails for any reason. And keep the copies safely in a place you won’t forget. If you’re like me and update your OS regularly or try new software from time to time, it’s easy to keep your cards fresh. Otherwise, find a way to remind you to replace the card in each SBC at least every 3 years for safety and reliability.
POWER SUPPLIES
GENERAL INFO ON POWER SUPPLIES FOR SBCs
Wanna have some fun? Walk up to a group of audiophiles and shout (or log onto AS and post) “Power supplies don’t affect sound quality!” - then sit back and watch the fun. (This is the opposite of fun for me - CC :~) There are audio devices of all kinds out there being powered by everything from batteries to $3 wall warts to $3000 custom linear power supplies. And there are almost as many opinions about the value of each as there are audiophiles (and engineers and sales people and designers and manufacturers) to express them. Benefits of more sophisticated power supplies are often said to stem largely from lower noise into the Pi and lower noise back into the mains (with resultant cleaner power to everything else powered by the same circuit).
The question of whether a linear power supply improves sound quality remains hot and unsettled. I love this quote from AudioBacon: “There isn’t a piece of audio gear that won’t benefit from a better power supply”. But there are some useful observations with data available to inform this decision. Here are spectral scans of the output of a cheap consumer wall wart SMPS, an Apple 5V 10W USB wall wart, and a basic Manson linear PS for lab use, courtesy of and thanks to HiFiBerry’s Daniel Matuschek. He ran idling and loaded scans for each, but could not find the unloaded Nokia image for us 3 years after making it. The load used to stress the PS was the transfer of files to the test Pi via SSH.
Here’s the output of a Nokia 5V SMPS with a working load. Notice the noise across the spectrum:

Here’s a scan of the Apple SMPS’s output with no load (except the impedance of the analyzer’s input):

Here’s the Apple under load, noisier than it was with no load but still much quieter than the Nokia:

And here’s an entry level Manson lab grade linear PS, first at idle:

...and then under load:

The Apple SMPS is much closer in performance to the linear lab supply than it is to the Nokia. And the linear lab supply didn’t bat an eyelash.
I haven’t scanned the output of an “official” Pi 4 SMPS because Archimago has already evaluated multiple Pi supplies and concluded that “There is no evidence that using the switch mode power supply adds to "noise". I haven’t included his scans because they add nothing to the discussion beyond his stated opinion supporting the use of SMPSs (& I agree). But it is abundantly clear that whatever power supply you decide to use must maintain full and correct operating voltage under full load in perpetuity.
BEYOND THE BASIC WALL WART
Comments offered about upscale power supplies for audio equipment on the web include a lot of high praise, like this from Hans B about Sbooster powering Brooklyn: “I have never heard a glockenspiel this clean” (a truly unique observation probably also never heard before). They also include a lot of disappointment, e.g. this from ideasbox on AS, also about Sbooster powering Brooklyn “bad...losing dynamic overall...In the end I prefer to use good power supply cable”. Unfortunately, I can’t find many well done comparisons of stock and improved PSs on SQ from a Raspberry Pi. On the RuneAudio forum, we find some informal reviews, e.g. “the electricity supply can make a noticeable improvement in sound quality to many hifi components. However, the Pi - being a very basic machine - doesn't benefit much from a LPS”. But, of course, we also find the exact opposite in another post on the same site: “That is total nonsense, the PI is digital, the stream to the digi is digital, the stream out of the digi is digital, how can a linear PSU improve sound?” Supporting the latter opinion is Durio, the maker of a HifiBerry competitor DAC hat. Durio only sells switching power supplies and states in their descriptive information that their upscale Pro version “comes fully loaded with the 5V switching power supply... This provide the cleanest power to the DAC chip for the ultimate sound quality”.
Hans B (whose reviews I’ve always found to be so vague and subjective as to tell me nothing, despite the drama with which he presents them) offers THIS interesting comparison of 4 power supplies for the Pi - the stock one, the $49 iFi iPower, the ~$100 Audiophonics LPSU25, and the $359 Sbooster. He’s comparing them powering a Pi with a HifiBerry DAC+ hat, but interestingly states that he sees no audible benefit to powering the Pi and the DAC separately. Bottom line: he found that SQ got better “as the power supply got more expensive”. For example, the sound of the harmonica resembled “anything but a mouth harp” with the stock PS, improving with the iPower to be “dynamically more appropriate but with some unnatural coloring”, and getting better with the Audiophonics and the Sbooster. Hans thinks that the stock PS made Bob Dylan’s voice sound like “he’d been in a bar fight and lost a few teeth”. Hmmm.
Archimago offers THIS somewhat more objective approach with measurements to support his opinion (but without comparison to higher level PSs). The bottom line is clear and coincidentally consistent with my own observations. “The Raspberry Pi 3 playing to the USB DAC is indeed ‘clean’; as in just as noise-free and ‘bit-perfect’ as other computer-based servers sending to a good asynchronous DAC...It sounds great to me...May I also remind everyone that this is all with an inexpensive switching power supply... No noise of significance even with the 192kHz test beyond the audible spectrum”.
All of my DACs but one are powered independently, so I’ve never been able to try a fancy PS on a DAC, I see that Amazon has a few nice little linear lab power supplies for well under $100, so I plan to buy one to make some of these comparisons of Pi power for myself. But for now, I have to say that I don’t hear obvious SQ deficiencies from use of a SMPS on a Raspberry Pi, and Bob Dylan has all his teeth when singing through my system. So an expensive power supply will be a hard sell to me.
WALL WARTS AND BATTERIES
I use the “official” SMPS on each of the 7 SBCs in daily use around here. The “official” Rpi power supply is a garden variety switcher in a wall wart, boosted to 3A for the Pi 4 from 2.5A for the 3B+ and I have half a dozen 2.5s plus three 3A units. Thanks to the power of a loss leader sale, I own a few “better” SMPSs as well - and I cannot hear any difference at all between the $30 ones and the stock Rpi units on Pi3s or Pi4s. The same is true for my Beagles (Black, Green, and xM) – a standard SMPS sounds as good to me as my $25 one. There’s no more or less air, no change in the sound stage, and no consistent difference in any identifiable parameter of SQ. All of these observations have been made with USB input to the same DACs driving the same systems I’ve described many times before in these pages. All power supplies are plugged into medical grade filtered power strips I got from biomedical engineering at the academic medical center in which I’ve worked for 38 years.
There are many reports of much better sound from Raspberry Pis powered by batteries – “smoother” is the most often used adjective I’ve seen. So I found a few 10,000mAh “power banks” and compared them to the stock SMPSs. Again, I found no consistent, clear difference either way. Of course, there are bipolar reports on the web. From the MoOde forum, we find this: “I regularly run moOde on Raspberry Pi 3 B+ headless from battery pack (2.4 A) with headphones, and just as often from the official switching PSU with headphones. In my experience the sound is noticeably more lively when connected to mains, and hands down better”. And we find this in the same thread: “...a switching supply is fine for the Pi and a nice, low-noise linear supply is best for the dac”. Go figure!
TAKING THE FIRST STEP
There are “better” switching power supplies available for the Pi as well as other audio devices. I have a ten year old Cbinese SMPS (branded as ENG) that I use with my Beaglebone Black. It’s actually attractive for a wall wart, lightly finned (I assume for cooling), twice the size of the Pi SMPS, with heavier gauge wire in and out and a pretty nice barrel plug. It never gets warm, and the ‘bone sounds great with MPD playing any format I have. I actually bought it before I got the ‘bone, and I’ve tried it against the stock $3 SMPSs sold in Beaglebone packages over the years with no audible difference.
The iFi iPower is one step up in price but a huge (claimed) leap in quality – it’s a $50 wall wart that iFi says is “...20x quieter than audiophile linear power supplies and 1000x quieter than standard SMPS wall adapters”. Since the dB is an exponential function, I’m not sure how one quantifies such improvement, so I’m accepting it as subjective impression. Hans B thinks that the iPower makes the sound quality of a Pi a bit less grotesque than it is with the standard Pi SMPS, which (from his description of the deficiencies in the stock unit) might mean restoring a few of Bob Dylan’s teeth and letting the harmonica sound like an “unnaturally colored” harmonica rather than not like one at all.
MOVIN’ ON UP
The upper middle ground is occupied by units like the Sbooster, a well designed, well made, and well reviewed power supply available with six different output voltages (one to a box – they’re not switchable). Assuming you hear the amazing improvement in SQ reported by many reviewers, it’s very reasonably priced at $359 for the 5-6V unit from Kevin Deal’s Upscale Audio. I have no experience with it, but Kevin’s judgment has been consistent with mine since I first met him when buying my Prima Luna power amp from him. As he’s been correct about everything he’s told me in the ensuing years, I don’t doubt that he finds value in the Sbooster and I’d love to hear it myself. To be fair, though, most of the praise for it comes from powering DACs and none from powering a Pi. For example, Hans praises the Sbooster Eco Mk II to the skies when powering his Brooklyn, giving it what I assume is a high and undoubtedly unique compliment indeed: “I have never heard a glockenspiel this clean”. Unfortunately, I can’t find a single report of its use with a Raspberry Pi or other SBC. If I come across one used or at a big enough discount, I’ll buy it just to see if it has any effect on SQ.
THE BIG LEAP
There are many diverging opinions on the value of high end linear power supplies for audio. User quotes vary from “I think that these products are unnecessary and a waste of money” to this wordy quote from Dimdim comparing his TI regulated, toroidal transformed LPS to a wall wart: “The difference between the two power supplies was immediately obvious. It was like with the SMPS we had an at-best mediocre source – DAC combination, while with the linear power supply the setup became ‘proper’, it sounded ‘in-place’ among my friend’s high performing system. The sound stage became better defined, the detail level went up, overall the presentation was more realistic. In other words, it was like the jitter of the system went down, but perhaps the noise levels in the system also decreased...no serious audiophile should be powering his RPi by a run-of-the-mill 5V SMPS”. Or, in the immortal words of Mark Twain, “you pays your money and you takes your choice”.
Choices above the Sbooster level can get mighty pricey. Popular power supplies from audio suppliers include the Illuminati ($1250), the UpTone JS2 ($925), and the NikolaS ($695), all of which have laudatory reviews somewhere on the internet.
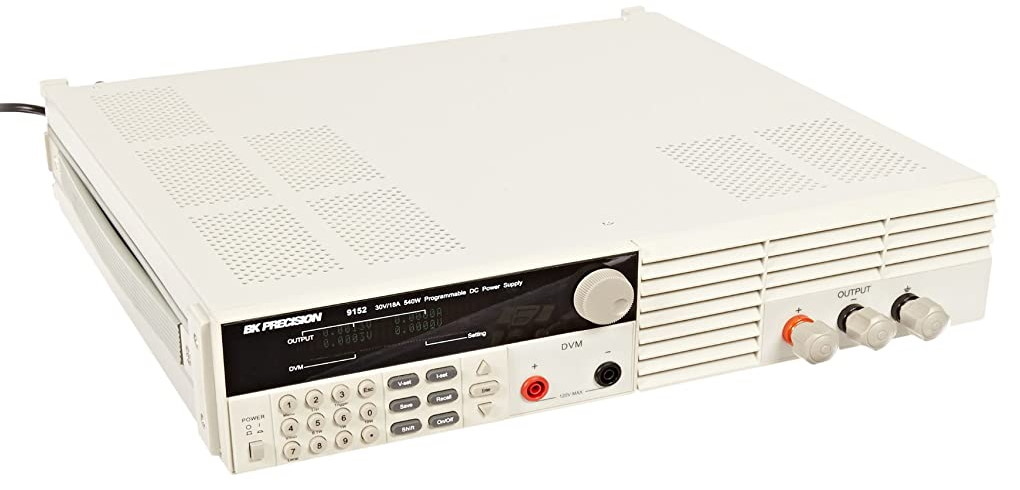
Some are using laboratory power supplies, which are tightly regulated and generally believed to provide cleaner, purer, quieter and more stable power than little plastic boxes. We had several in our IT labs at my university, but I don’t own one at home. I found the TekPower ($80) to be a very nice little unit that I’m considering buying to try with audio devices. The next step up in lab supplies is something like the Rigol ($500), which is also a nice unit but seems a bit over the top to me for a Pi. And you can go well beyond this if you’re of a mind to do so. For example, the $3000 BK Precision 9152 is a very nice little unit with great specs but limited flexibility (e.g. a single output). These are also either impressive looking or horribly inappropriate for open display, depending on your bent.


You can spend a lot more, but I honestly don’t know if it’s worth it because I’ve never tried any of them. If you hear a difference that’s worth the price to you, go for it – and please post it on AS.
USB POWER
Despite improved implementation on Pi 4, USB power is still a potential performance choker. The Pi 4 has higher bus speed to support USB3, which is potentially great for performance. But the maximum power draw through all USB ports together remains 1.2 amps. And at 600mA, the bare board draws 100mA more than the Pi 3B+ did. So even though the 3 amp Pi 4 power supply can deliver an extra half ampere over the Pi 3’s, available USB power for peripherals remains the same and the “extra” 400mA will not impact devices attached by USB.
How does this affect performance? A Pi 4 is powerful enough to make good use of USB3 peripherals, so it can push some serious music from a USB drive to your network players and streamers. Remember that a USB3 connection moves up to 4.8 gig/sec, while a USB2 is limited to 480 MB/sec. And USB will carry ~900 mA readily, while a USB2 connection will handle only 500 mA. A typical big hard drive can draw 1A at a full tilt boogie, which is at (or even slightly above) the USB3 max. As the sole USB peripheral, that drive may do OK. But adding a second USB device of almost any kind will load the USB bus to the max and neither device will get all the power it needs. If you try to power both a USB drive for library storage and a USB DAC for your digital audio output, you will have no problem identifying the effect on SQ, player performance, or both. GUI performance will be sluggish, files will load slowly, and you’ll probably have extraneous noises and dropouts during playback.
The fix is easy – power USB devices externally or through a powered hub. Although I use a NAS for file storage in my own networks, I have a 2 TB Seagate external HDD with its own independent PS on my experimental and development devices. Even when making live recordings or ripping vinyl & CDs on a Pi 4, I can use a USB powered audio interface like my M-Audio along with the HDD without fear or failure, because it’s the only load on USB power.
OVERCLOCKING
This is a fancy term for increasing the CPU’s clock speed, which will enable faster processing of some but not all requests to the processor. It’s like modifying a car engine so it can rev higher, except that you don’t need to change any hardware or make any physical modifications beyond cooling to do it on a computer. However, just like a car engine, you can blow it to bits if you overdo it – so be careful! You do this entirely at your own risk, except that the warranty now covers a Pi4 even if overclocked to the max as long as you haven’t also added the line that puts it in “turbo mode” (which won’t benefit you at all for audio). Here’s a link to the Raspberry Pi Foundation’s official word on overclocking and the warranty.
Speeding up any clock on a computer (“overclocking”) is a time honored tradition in computer hot rodding. You can overclock almost any processor if you know how, although it’s often much easier than it is smart or beneficial. Overclocking increases the demands for power and cooling, so it requires attention to both if you want your Pi to function well and live a normal life.
Although CPUs are “speed rated”, those ratings are like any other performance measurement – they’re stated under specific conditions and are not the sole indicator of performance potential. Amplifier power is rated as X watts at Y% THD and Z% IM under specific circumstances, e.g. continuous vs peak, both channels driven or one, across the frequency spectrum or at a specific test frequency etc. My 35 WPC Prima Luna tube amp will drive any speaker to higher SPLs than my 100 WPC Alesis SS amp – but it’ll use more power doing so and heat up the room in the process. Its rated distortion is higher, but it sounds better. Tradeoffs!
Horsepower is rated at a specified engine speed, with specified accessories in place (e.g. alternator, clutch / torque convertor, exhaust), using specified oil, at a specified temperature etc. But rated power alone does not tell you much. A 2L diesel engine may make 125 bhp at the flywheel at 1700 RPM, but be able to pull a 5000 pound trailer across the country at sustained speeds of 75+ mph while getting 40 mpg and hardly breaking a sweat. Yet a 2L gasoline engine that makes 185 bhp at the flywheel at 6500 RPM may not be able to pull a 1000 pound boat 100 miles at 60 mph without overheating. Similarly, a 1.5GHz CPU with optimal bus speeds, RAM, connectivity etc may make much better sound and manage a large library much better than a poorly set up 3GHz machine. Tradeoffs!
Clock speed is determined by a configuration file called config.txt that’s located in the boot directory. Open it with the editor of your choice (I like nano) and find the line in the [Pi4] section that says “#arm_freq=XXXX”. Uncomment it (i.e. delete the hash) and change the number to your desired frequency up to 2147. Just like an auto engine, higher revving means more fuel. A race car engine needs a higher flowing fuel pump to supply the extra fuel that lets it rev to its new limit. For a CPU, electrons are the fuel and voltage is the pump – so you need to up the CPU voltage as well. To do this, you have to add a line before or after the speed line that says “over_voltage=X”. The usable range is -16 to +8. Most people use 2 for 1750MHz and 6 for 2147 – but, again, your Pi may not like this. Watch the desktop for an undervoltage indicator ( ), which will pop up to tell you the CPU is not getting enough power.
The devil’s in the details! CPU clock speed is a measure of how many clock cycles it completes in the stated time period. This is a simple measure of how many sequential computations it can do, one at a time back to back. But it’s not a measure of overall computer speed because modern processors can do more than one thing at a time. With multiple cores and hyperthreading, a CPU can complete far more work in a single cycle than is measured by clock speed. The faster it runs, the more it can do in a second. But it takes more power to run the same clock faster, and it generates more heat while doing so. Tradeoffs!
You can overclock both the CPU and the GPU the same way on full size Pis. You can also overclock the DDR2 sdram frequency on a Pi 3 to 500 MHz from the original 400 (which is of little to no benefit in audio use). But you can’t overclock the 4’s sdram - it’s DDR4 3200, which is already 8x the speed of the sdram in a 3B+. You can see your sdram speed by entering vcgencmd measure_clock pllh into a terminal window. It’s displayed in Hz, so move that decimal point 6 places to get back to reality.
Be aware that SBCs appearing to be exactly the same may not respond exactly the same way to this kind of modification. There are many reports on the internet of crashing Pis clocked only to 2000MHz, even though some (including all of mine) hit 2147MHz without batting an eye. So the best advice I can give is to raise it a bit at a time, e.g. first to 1750, then to 2000, then to 2147 if desired. If if fails to boot after increasing the number in the config file, you’ll have to reduce it by opening that file with the card is mounted as a directory on another computer.
THE BOTTOM LINE
Why should you do any of these things to your Pi? You may not benefit at all, if your only use is unprocessed 2 channel listening to nothing more refined than Redbook quality flacs, free Spotify or basic Amazon Music. But if you’re pushing heavy DSP, running high res MC, driving your home theater, or otherwise testing the limits of your Pi, you’ll almost certainly benefit from at least one or two of these mods. If nothing else, keeping the temperature down to the low 60s (C) will prolong your Pi’s life and keep it running at its maximum specified clock speeds. And bumping your speeds will make graphics-heavy packages like JRiver Media Center much smoother and easier. As a final example and a taste of the next installment on audio projects with the Raspberry Pi, here’s a clear benefit of the full tilt boogie approach to rodding the Raspberry.
First up is the initial minute of Dave Grusin’s Discovered Again, ripped from the original 1976 Sheffield vinyl to WAV. The playback chain is my Thorens TD125 / SME 3009 / Audioquest cartridge through a Parasound Zphono-USB into an overclocked, zram’ed Raspberry Pi 3B+ running Audacity on Raspbian. The WAV was saved on an externally powered Segate 2TB USB2 HDD, then normalized on the same Pi. I’ve converted it to FLAC for my own use, but I couldn’t get LibreOffice to embed a FLAC file in this document, so I used the original wav.
The second file is a live minute of my jazz trio playing Come Rain or Come Shine. This was recorded in stereo from a board feed at the small club in which I’m the house band leader (I’m the guitar player on this). Unfortunately, the sound guy had it set up for a mono feed into both channels – so it’s mono. But it demonstrates how well even a Pi 3B+ can record live music. In the next installment of The Value Proposition in Audio, I’ll detail building a Pi4 recorder and include tracks from live performances at the club.
Have fun and stay tuned!
Audio Files


Recommended Comments
Create an account or sign in to comment
You need to be a member in order to leave a comment
Create an account
Sign up for a new account in our community. It's easy!
Register a new accountSign in
Already have an account? Sign in here.
Sign In Now