


Introduction
It was a dark and stormy night. Not a creature was stirring, not even a mouse. Now that I’ve hooked you with these clichés, the real saga begins.
The only sound to be heard was the soft patter of sleet and freezing rain covering every exterior surface with a translucent glaze. At 2am, the power went out, not to return, other than for a couple of brief 1-2 hour spells, for 5 days. The ice storm was followed by successive days of snow, more ice, and then, more snow. All this, while temperatures dipped as low as 5º F. Meanwhile, my family and I huddled, lived, and slept around our gas fireplace, thankful we at least had some heat. Wow, you say, winters are tough in Minnesota. Think again, buster. This was Austin freakin’ Texas! Where normal weather in mid-February is mild days in the 60s and cool nights in the 40s.
When power (and water!) finally returned, and we slowly got back to normal, my wife and I had the “talk” about protection. No, not that protection, the one about backup power and resilience from outages. What seemed nice in the past became an imperative now. We were now painfully aware of how unreliable our power grid really was.
Of course, we live in Texas, where natural gas is cheap, as is electricity. The cheapest option, and most resilient to an outage of indeterminate duration, would have been a whole-house backup generator. I had priced a system like this in the past — a snazzy, Generac 22kW — and been quoted $9k fully installed. Well, that was before an actual disaster. Now (April 2021), when I could actually get a contractor to even come out and give me a quote, the price was $18k! Long live American Capitalism! Supply and Demand, Sucka’s!
In any case, my progressive wife and daughters recoiled at the prospect of putting a noisy, smelly, fossil-fuel-burning machine next to our house. Despite the considerably greater cost, the decision was made to invest in solar panels with battery backup. Before you ask about ROI, let me stipulate — we’re not going to break even on this for decades, if ever. Our electric rates are cheap (barely over 15¢/kWh, even at the highest slab of our tiered rates), and we do not have time-of-use rates. There is a whole rabbit hole to go down to discuss ROI, but that’s not the focus of this article. Let me just say - this was not an ROI-driven decision.
Solar + Battery Backup System
I will also not go deep into the process of selecting a solar contractor. The same supply and demand economics that was driving the generator guys was also driving the solar guys. I got 3 laughably large bids from local solar contractors, after which I decided to go with Tesla, with their upfront, no-fuss pricing right on the website. I selected a 12.24kW system, with 36x 340W panels, along with 3x PowerWalls, with a total capacity of 40.5 kWh.
Tesla moved quite briskly through the steps of system design and permitting, while I got HOA approval. In early June, all the steps needed to schedule installation were done, but then our utility (Austin Energy, or AE) threw in a 4-month delay to schedule a TDR (temporary disconnect-reconnect). The TDR is needed during install for the Tesla electricians to safely reroute the grid connection. Thus began the wait.
Finally, in late October, the install actually occurred over 2 intense, dawn to dusk days. I was quite impressed with the Tesla crew, both the panel installers and the electricians. I don’t want to wax too lyrical about Tesla, however. There were plenty of issues as well, especially as their communication (phone/email/text) really sucks. Again, this article isn’t about all the design and scheduling issues that are typical in this kind of project. Suffice it to say that at the end of day 2, my system had been tested and was operational. Of course, this just means it is potentially operable, as there are at least 2 steps remaining: AE’s inspection of the work, followed several weeks later by AE’s PTO (permission to operate). So as of this writing, the story isn’t complete. But don’t worry, I’ll have more to say in a future article!
The Installed System
One of the few benefits of the long delay is that in the interim, Tesla rolled out new, more efficient panels that produced 425W, instead of the 340W specified in my original system. This changed my system design down to 29 instead of 36 panels, totaling 12.35kW. This actually worked out very well, because I was able to optimize my design further by ensuring:
- no panels on the least-efficient north-facing roof plane,
- ~50% of panels could fit on my most-productive south facing roof plane, and
- No panels on a west facing roof plane that gets significant afternoon shade.
Effectively, I was able to achieve a shade-free install. This is important because of something I haven’t mentioned yet — inverters. Tesla’s system uses string inverters, which makes many installers and well-meaning friends fall over themselves to tell you how micro-inverters are so much better. This is certainly important when shade is a factor, but my install was blessed in that regard. Yet another rabbit hole I would like to avoid going down, but I thought I’d mention it for clarity.
Here is an annotated picture of the electrical part of the system:

This layout does not reflect what most Tesla systems would look like if installed today in other locales. The separate inverter and gateway boxes now live in a tidy integrated module above the PW proper, in a configuration called the PowerWall +. Also, where allowed, Tesla is using a so-called backup switch. This allows a much simpler and cleaner install, as shown on this page.
As the lead electrician told me, as we were going over the system at the end of day 2, my utility AE (Austin Energy) is apparently very old-school, so requires everything (inverters, gateway, powerwalls) to be broken out, and each protected by emergency shutoff toggle switches. They also use the quite uncommon VOS (value of solar) metering method, as opposed to the almost ubiquitous NEM (Net Metering) method. This requires the installation of a PV meter that measures production from the solar panels. The cutout for this is shown in the annotated picture. The PV meter will go in during (or after?) inspection.
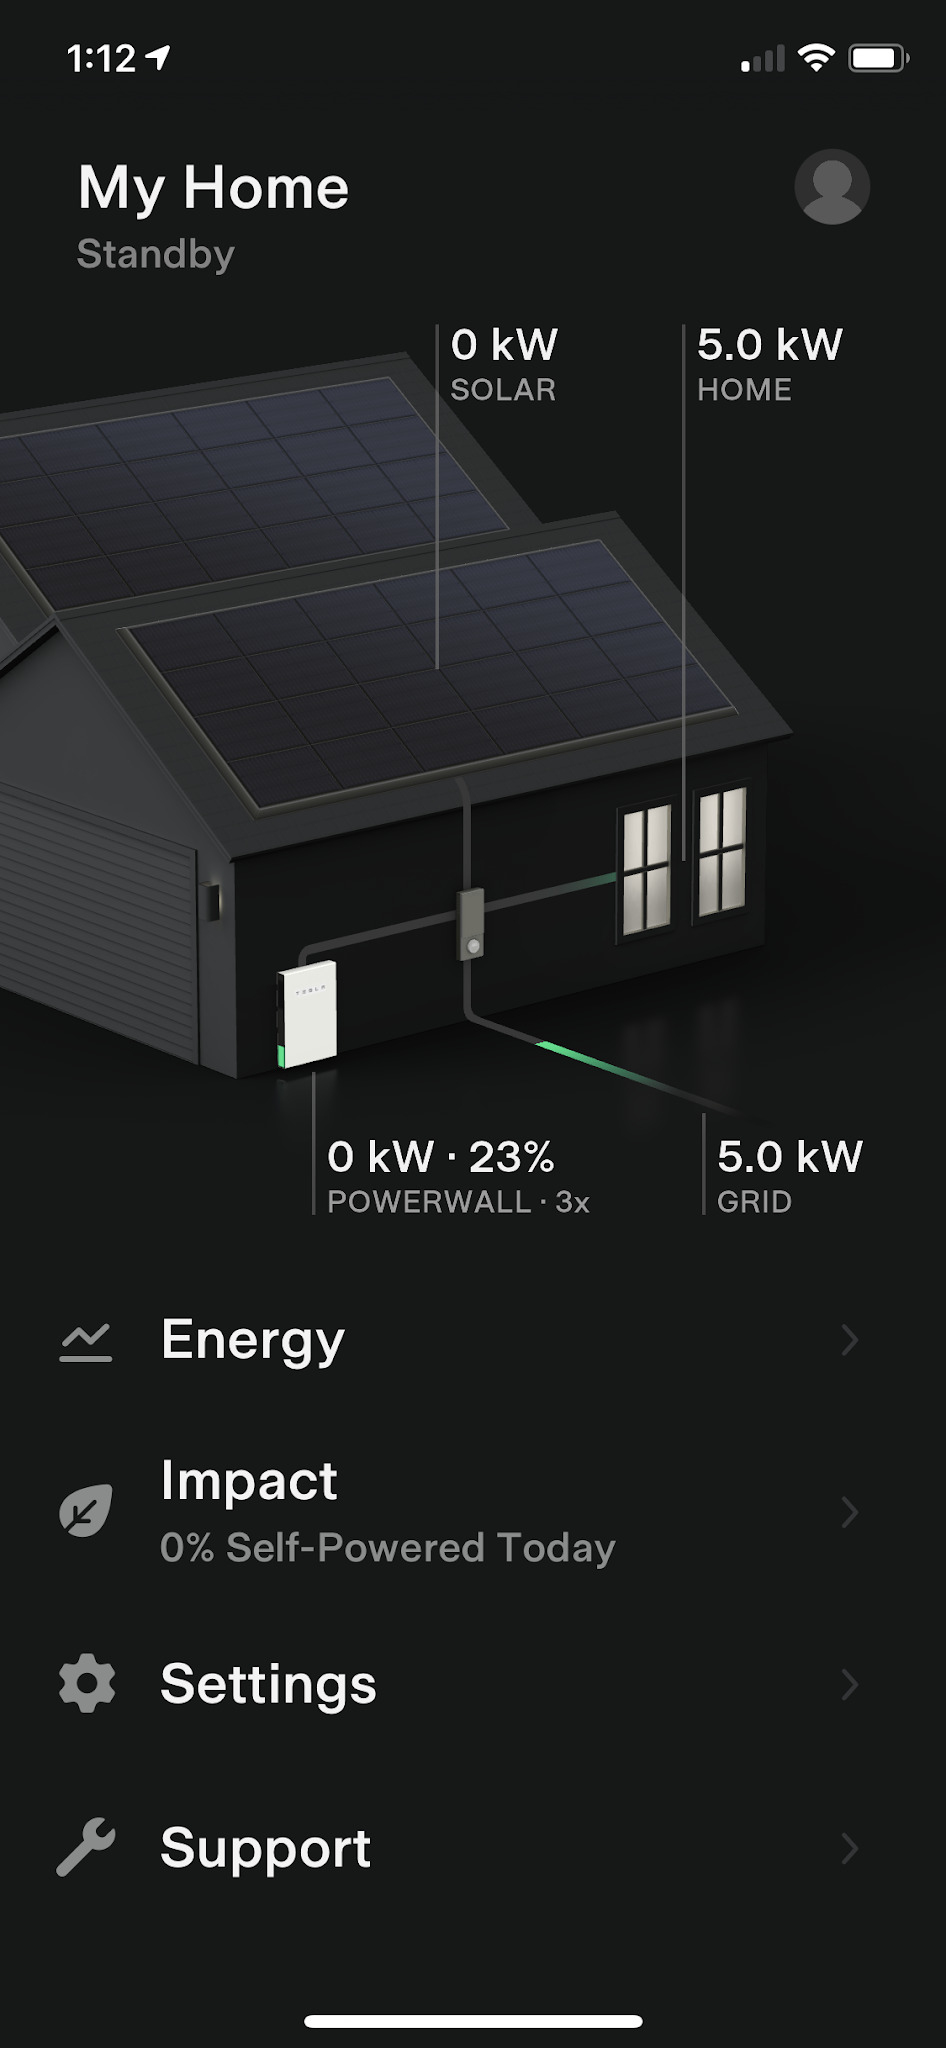
How Energy FLows - Quick Orientation
One benefit of AE’s old-school installation requirements is that it allows you to easily visualize the way the system works.
Starting at the far right, you see the ingress of the grid through the main meter. This used to feed my 200A main house panel directly, via the dashed green arrow. This path is now gone. Instead the grid now feeds into, and is one of the inputs to, the brains of the system, the Gateway. This is shown by the orange arrow.
Also feeding the Gateway is a feed from the solar panels. The DC energy from the panels flows down from the roof through the conduits leading to the 2 Inverters (marked INV in the picture). These Inverters then feed AC through AE’s PV meter to the Gateway (blue arrow).
Finally, the 3 PowerWalls, mounted in a line (marked PW) on the left end of the picture, feed AC to the Gateway (note: PW’s have built-in inverters) via the red arrow.
Energy to the main house panel is now fed by the Gateway. Based on demand, instantaneous PV production, and policy settings selected by the user, the Gateway feeds a combination of panel, battery, and grid power to the panel. This is important to remember as we get to the next section on audio considerations.
Also relevant to the audio considerations are two further points. First, as required by AE, the techs also installed a new ground rod during install. My house is of recent construction (built 2000), and had existing grounding in the slab and cold water pipes. This new ground rod (don’t know the gauge, should have asked) goes down about 6 feet. Don’t laugh, I live in the hills of NW Austin, and am basically sitting on a piece of rock. I was actually surprised they got 6 feet deep before hitting rock! Does this grounding improve/degrade sound quality (SQ)? Impossible to say, as I couldn’t do a controlled listening test.
Finally, you can see the 6AWG cable (labelled 6AWG Dedicated Circuit), that I specially sourced from Jim Weil of Sound Application a couple of years ago, running straight down from the main panel and going into the house. That’s because my listening room is right behind the exterior wall shown.
Audio Considerations
Finally, we get to the good stuff, I hear you saying! Did you even think about how this would affect your audio SQ?!
Yes, I certainly did. All the time I was waiting for the install, I was in two minds as to which way to go. I knew my dedicated audio circuit provides a huge improvement in SQ, as I described in a forum post at the time.
I could ask the install crew to put my audio dedicated circuit on a bypass panel (only connected to the grid). Or I could take a leap, and see how my SQ changed with solar panels and Powerwalls. I decided to take the leap.
But I needed a listening test during install to know if I’d made a horrible mistake! My rationale was as follows. The biggest concern was whether the Gateway in the path for grid power caused a big degradation in SQ. Here’s why. Even if I found solar panel power through the inverters, or battery power from the Powerwalls to sound like crap, I could always finesse the Gateway to feed only grid power to my system during listening sessions. This is a simple matter of configuration with the Tesla app.
But if grid power, routed through the Gateway, sounded significantly worse than the way it used to when directly connected, this was an irreversible problem. Having decided to take the leap, I needed to know quickly if I’d made a mistake, preferably during the install. This way, if I needed to bypass the audio circuit, I could negotiate something with the electricians while on site.
Listening Experiment to Evaluate Gateway Impact
 This was not an ideal A/B test. It involved listening to A and B about 6 hours apart. Moreover, listening test A occurred at 8am, a wholly uncivilized time of day when I’m normally never awake (I’m a night owl). Yet I did this all for you, dear reader!
Baseline (A): Before AE’s truck rolled in to disconnect power, I listened to my go-to test tracks on my system with the grid directly attached to the main panel, as I was used to.
Comparison (B): 6 hours later, after the grid input had been rerouted to the Gateway, and the Gateway feeding my main panel, AE’s techs turned the power back on. At this point, the Gateway could only feed grid power to the panel, as neither the solar panels nor the batteries were even connected. Still, this path included all the additional wire, connections, breakers, relays etc that could contribute to a degradation in SQ.
Result: Well, thank GOODNESS, I could detect no loss of SQ. I admit, a weight lifted off my shoulders, revealing how worried I was about the alternative! Obviously, these tests were conducted about 6 hours apart, but I know my system’s sound so well now, I would have immediately noticed a catastrophic SQ loss. Does this mean I would know if there was a slight SQ loss (1%? 5%? 10%?) I really couldn’t say. To be honest, I was really only concerned with a catastrophic drop in SQ, as a Stereophile reviewer reported earlier this year when he put in a backup generator with a transfer switch.
Conclusion
This is where things stand today, a few days after the install. My house is still powered by the grid, until Tesla crosses a couple more hurdles with the utility, AE.
I am relieved that based on my listening test above, the sonic penalty for allowing my dedicated audio circuit to be fed by the Tesla Gateway is either undetectable or very small. However, it’s still early days, and I’m not making any final pronouncements until I’ve lived with my system for a while!
Coming Next
In my next article, I expect to give an update on how things are going with the system. More specifically, I hope to report on the relative SQ (via listening tests) of solar panels, batteries, and the grid. Once my system is fully operational, I will be able to conduct a full comparison test, during a sunny day with plentiful panel production. I will configure the system in 3 ways, so that my house is receiving power from each of these in turn:
- solar panels -> inverters -> gateway -> main panel -> dedicated audio circuit,
- Powerwalls (builtin inverters) -> gateway -> main panel -> dedicated audio circuit, and
- grid -> gateway -> main panel -> dedicated audio circuit.
The results ought to be very interesting. Stay tuned.
My Listening Setup
Here is a diagram of my listening setup.
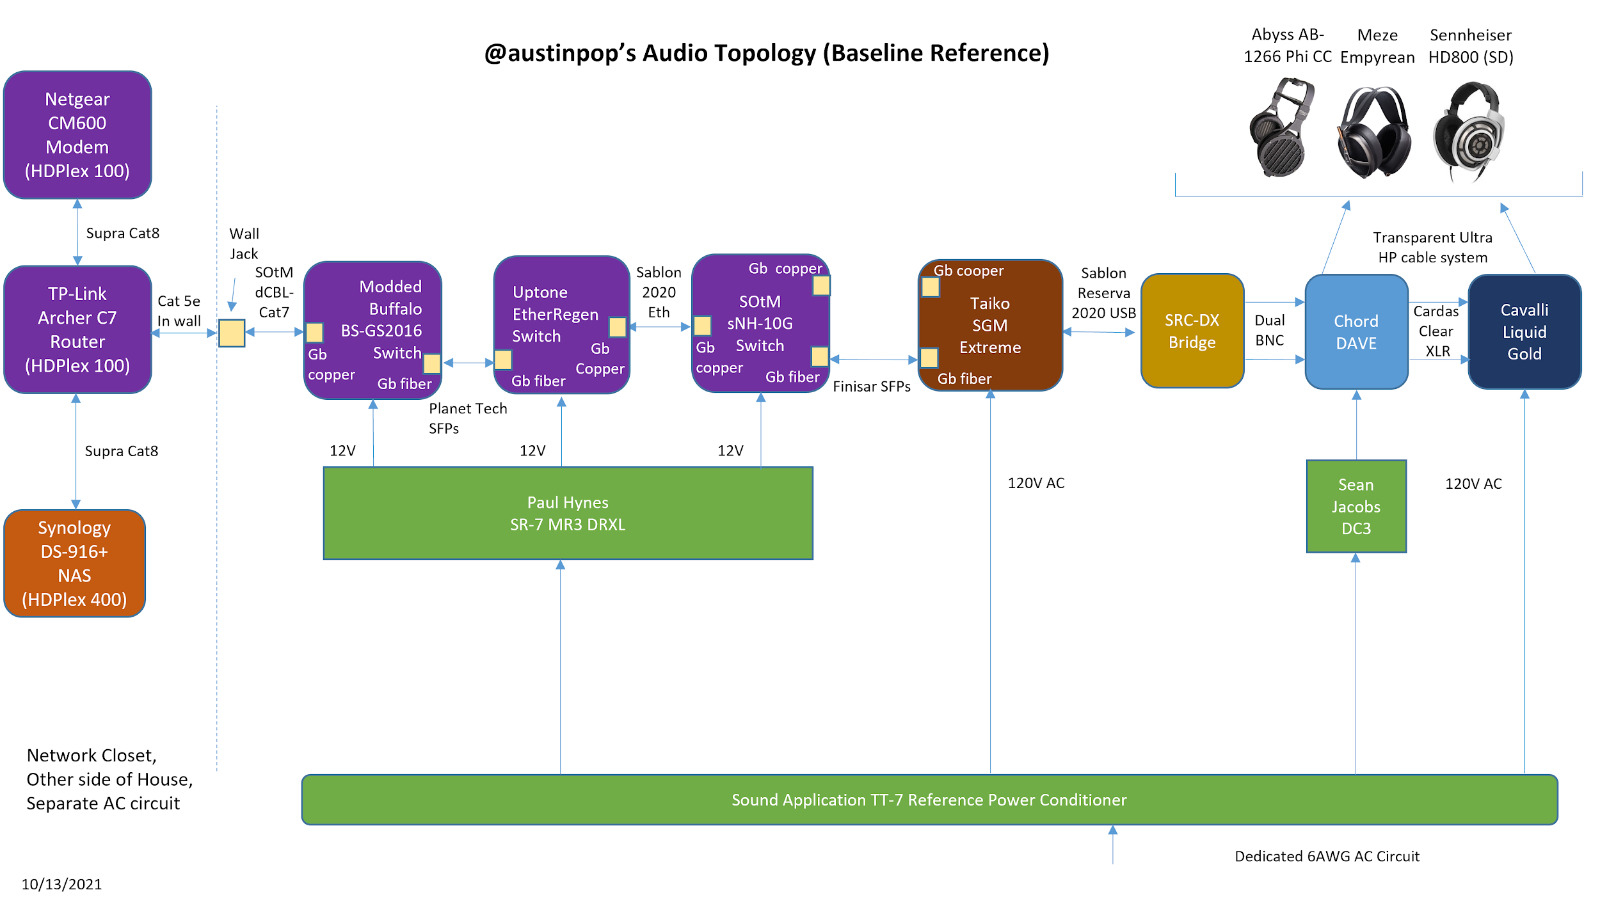
Primary System
Music Computer: Taiko Audio SGM Extreme Music Server, Taiko USB upgrade
Headphone Amplifier: Cavalli Liquid Gold
Headphones: Meze Empyrean, Abyss AB-1266 CC, Sennheiser HD800 (SD mod)
DAC: Chord DAVE
USB to dual-SPDIF: Audiowise SRC-DX bridge
Ethernet Switches: SOtM sNH-10G, Uptone EtherREGEN, Buffalo BS-GS2016 (modded for LPS)
Power supplies: Paul Hynes SR7MR3DRXL (dual regulation, 3-rail) for switches
Sean Jacobs DC-3 for DAVE
Power Details: Dedicated 30A 6AWG AC circuit, Sound Application TT-7 Reference Power Conditioner
Power Cables: Sablon King (wall to TT-7), Sablon Prince (Extreme), Cardas Clear Beyond (DC-3, SR-7),
Cardas Clear for all other components
USB cables: Sablon Reserva 2020 USB
BNC cables: High Fidelity Cables CT-2 in Schroeder config, JSSG360’d (DIY)
Ethernet cables: Sablon 2020, SOtM dCBL-Cat7, Supra Cat 8
DC cables: Neotech OCC (DC-3), Paul Hynes fine silver (SR-7)
Interconnects: Cardas Clear XLR balanced
Headphone cables: Transparent Ultra cable system
Accessories: Synergistic Research Tranquility Base XL UEF with Galileo MPC, Synergistic Research MiG 2.0 footers
Taiko Audio Daiza Isolation Platforms
Acknowledgments
Many thanks to the following companies for supplying cables and accessories to aid in this evaluation:
- Cardas Audio, for a full loom of Cardas Clear cables.
- Transparent Audio, for the Transparent Ultra headphone cable with a full complement of headphones leads and source terminators.
About the Author
Rajiv Arora — a.k.a. @austinpop — is both a computer geek and a lifelong audiophile. He doesn’t work much, but when he does, it’s as a consultant in the computer industry. Having retired from a corporate career as a researcher, technologist and executive, he now combines his passion for music and audio gear with his computer skills and his love of writing to author reviews and articles about high-end audio.
He has "a special set of skills" that help him bring technical perspective to the audio hobby. No, they do not involve kicking criminal ass in exotic foreign locales! Starting with his Ph.D. research on computer networks, and extending over his professional career, his area of expertise is the performance and scalability of distributed computing systems. Tuning and optimization are in his blood. He is guided by the scientific method and robust experimental design. That said, he trusts his ears, and how a system or component sounds is always the final determinant in his findings. He does not need every audio effect to be measurable, as long as it is consistently audible.
Finally, he believes in integrity, honesty, civility and community, and this is what he strives to bring to every interaction, both as an author and as a forum contributor.


Recommended Comments
Create an account or sign in to comment
You need to be a member in order to leave a comment
Create an account
Sign up for a new account in our community. It's easy!
Register a new accountSign in
Already have an account? Sign in here.
Sign In Now